RADON Mitigation ASD System
- Home
- RADON Mitigation ASD System
Active Soil Depressurization (ASD) System

Steps to install a Active Soil Depressurization (ASD) System
- Test for RADON - if a test has not already been completed.
-
Conduct a site survey - evaluate the home to determine the best suction point, discharge location, and pipe route for the RADON mitigation system.
This step should include a discussion with the homeowner to explain where the system will be installed and why each location was chosen.
Ensure proper discharge clearances are maintained.
- Perform diagnostic testing - verify that the chosen suction point will be effective.
Develop a system design, installation plan, quotation, and schedule. -
Assess and seal the foundation - identify areas that may allow conditioned air to be drawn into the sub-slab or reduce system performance.
Seal openings such as:
- the sump pit
- cracks or holes in the foundation connected to the soil
- floor-to-wall joints
- gaps under the furnace or bathtub
- Install the RADON mitigation system
- Post-mitigation testing - begin short-term RADON test (minimum 48 hours) at least 24 hours after the mitigation system has been installed.
- Homeowner follow-up test - conduct a long-term RADON test (minimum 91 days) during the next heating season to verify that RADON levels have been effectively reduced.
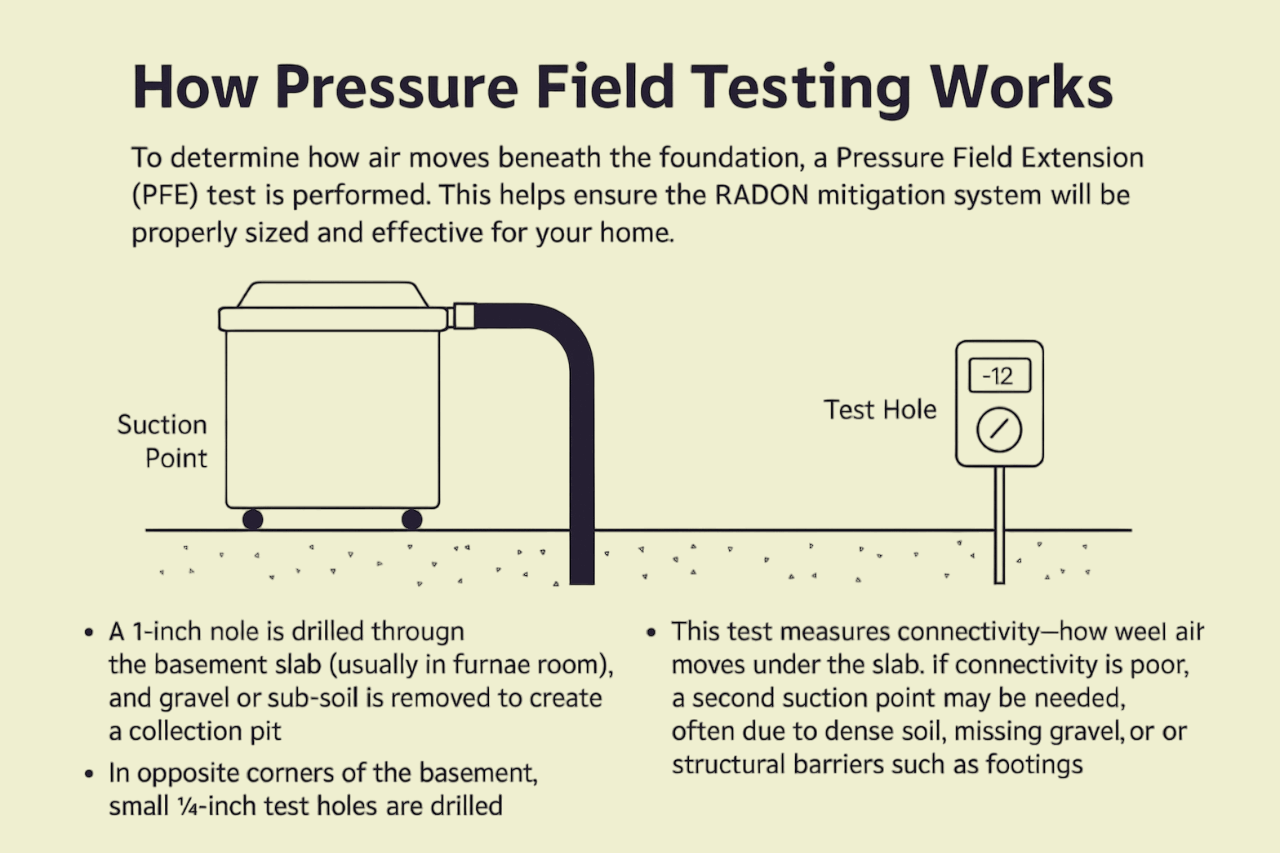
Communication (Connectivity) - Pressure Field Testing and Design
To determine how air moves beneath the foundation, a Pressure Field Extension (PFE) test is performed.
This helps ensure the RADON mitigation system will be properly sized and effective for your home.
How it works:
- 1-inch hole is drilled through the basement slab (usually in the furnace room), and gravel or sub-soil is removed to create a collection pit.
- In opposite corners of the basement, small ¼-inch test holes are drilled.
- A vacuum is applied to the main extraction hole while the pressure difference between the main point and the test holes is measured.
This test measures connectivity - how well air moves under the slab. If connectivity is poor, a second suction point may be needed, often due to dense soil, missing gravel, or structural barriers such as footings.
The results allow us to customize the RADON fan size and finalize the design of the Sub-Slab Depressurization (SSD) system.
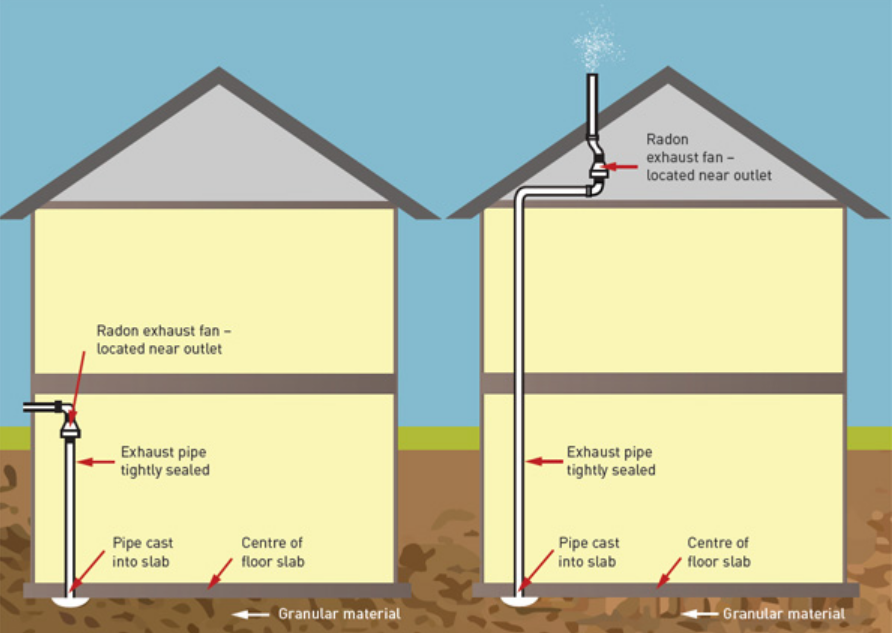
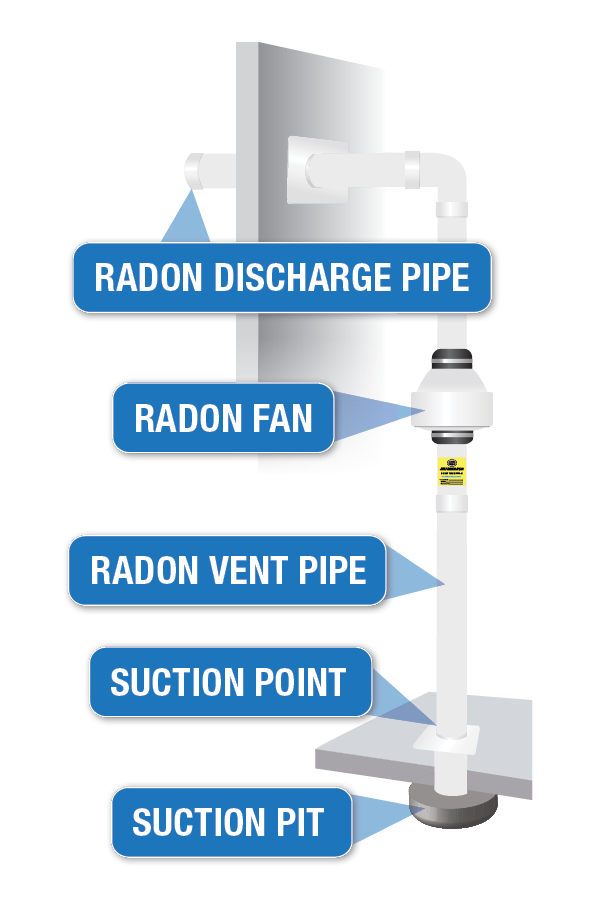
Components of an Active Soil Depressurization (ASD) System
The most common type of RADON mitigation system is called Active Soil Depressurization (ASD).
This system works by drawing air (and RADON) from beneath the foundation of a home and exhausting it outdoors.
Installation of an ASD system typically involves drilling a small hole through the concrete basement floor and connecting a PVC pipe that allows air to be pulled from the gravel and soil beneath the home.
A specialized RADON fan continuously pulls this air through the system and vents it safely outside.
The entire system is airtight and sealed, ensuring there is no communication between the system and the home’s interior air.
Main Components of an ASD System
-
RADON Discharge Pipe:The exhaust pipe vents RADON outdoors usually through a side wall or above the roofline. In snowy areas, it must be high enough to stay clear of snow.
A C-NRPP professional will ensure it meets all clearance and safety requirements.
-
RADON Fan:The RADON fan is the heart of the system-airtight, quiet, and energy-efficient. Only C-NRPP approved fans are used to ensure no air leakage into the home.
-
RADON Vent Pipe:Made from Schedule 40 PVC, usually 3-inch or 4-inch in white or grey. Strong and crack-resistant, it keeps the system airtight so RADON cannot leak into the home.
-
Suction Point:The point where the RADON mitigation pipe passes through the basement floor and connects to the suction pit beneath.
-
Suction Pit:A hidden but essential cavity dug into the soil and gravel beneath the slab. It helps draw air evenly from below the foundation.
The pit size depends on soil type, slab size, and system design, determined through pre-installation diagnostics.
