FAQ :About Mitigations
This section provides clear answers About RADON Mitigations - how it works, when it’s needed, and what methods are most effective for reducing RADON levels in your home. You’ll learn about different mitigation techniques, including sub-slab depressurization, system design, and post-installation testing to verify performance.
Our goal is to help homeowners understand how a properly designed RADON mitigation system can create a safer, healthier living environment for you and your family.
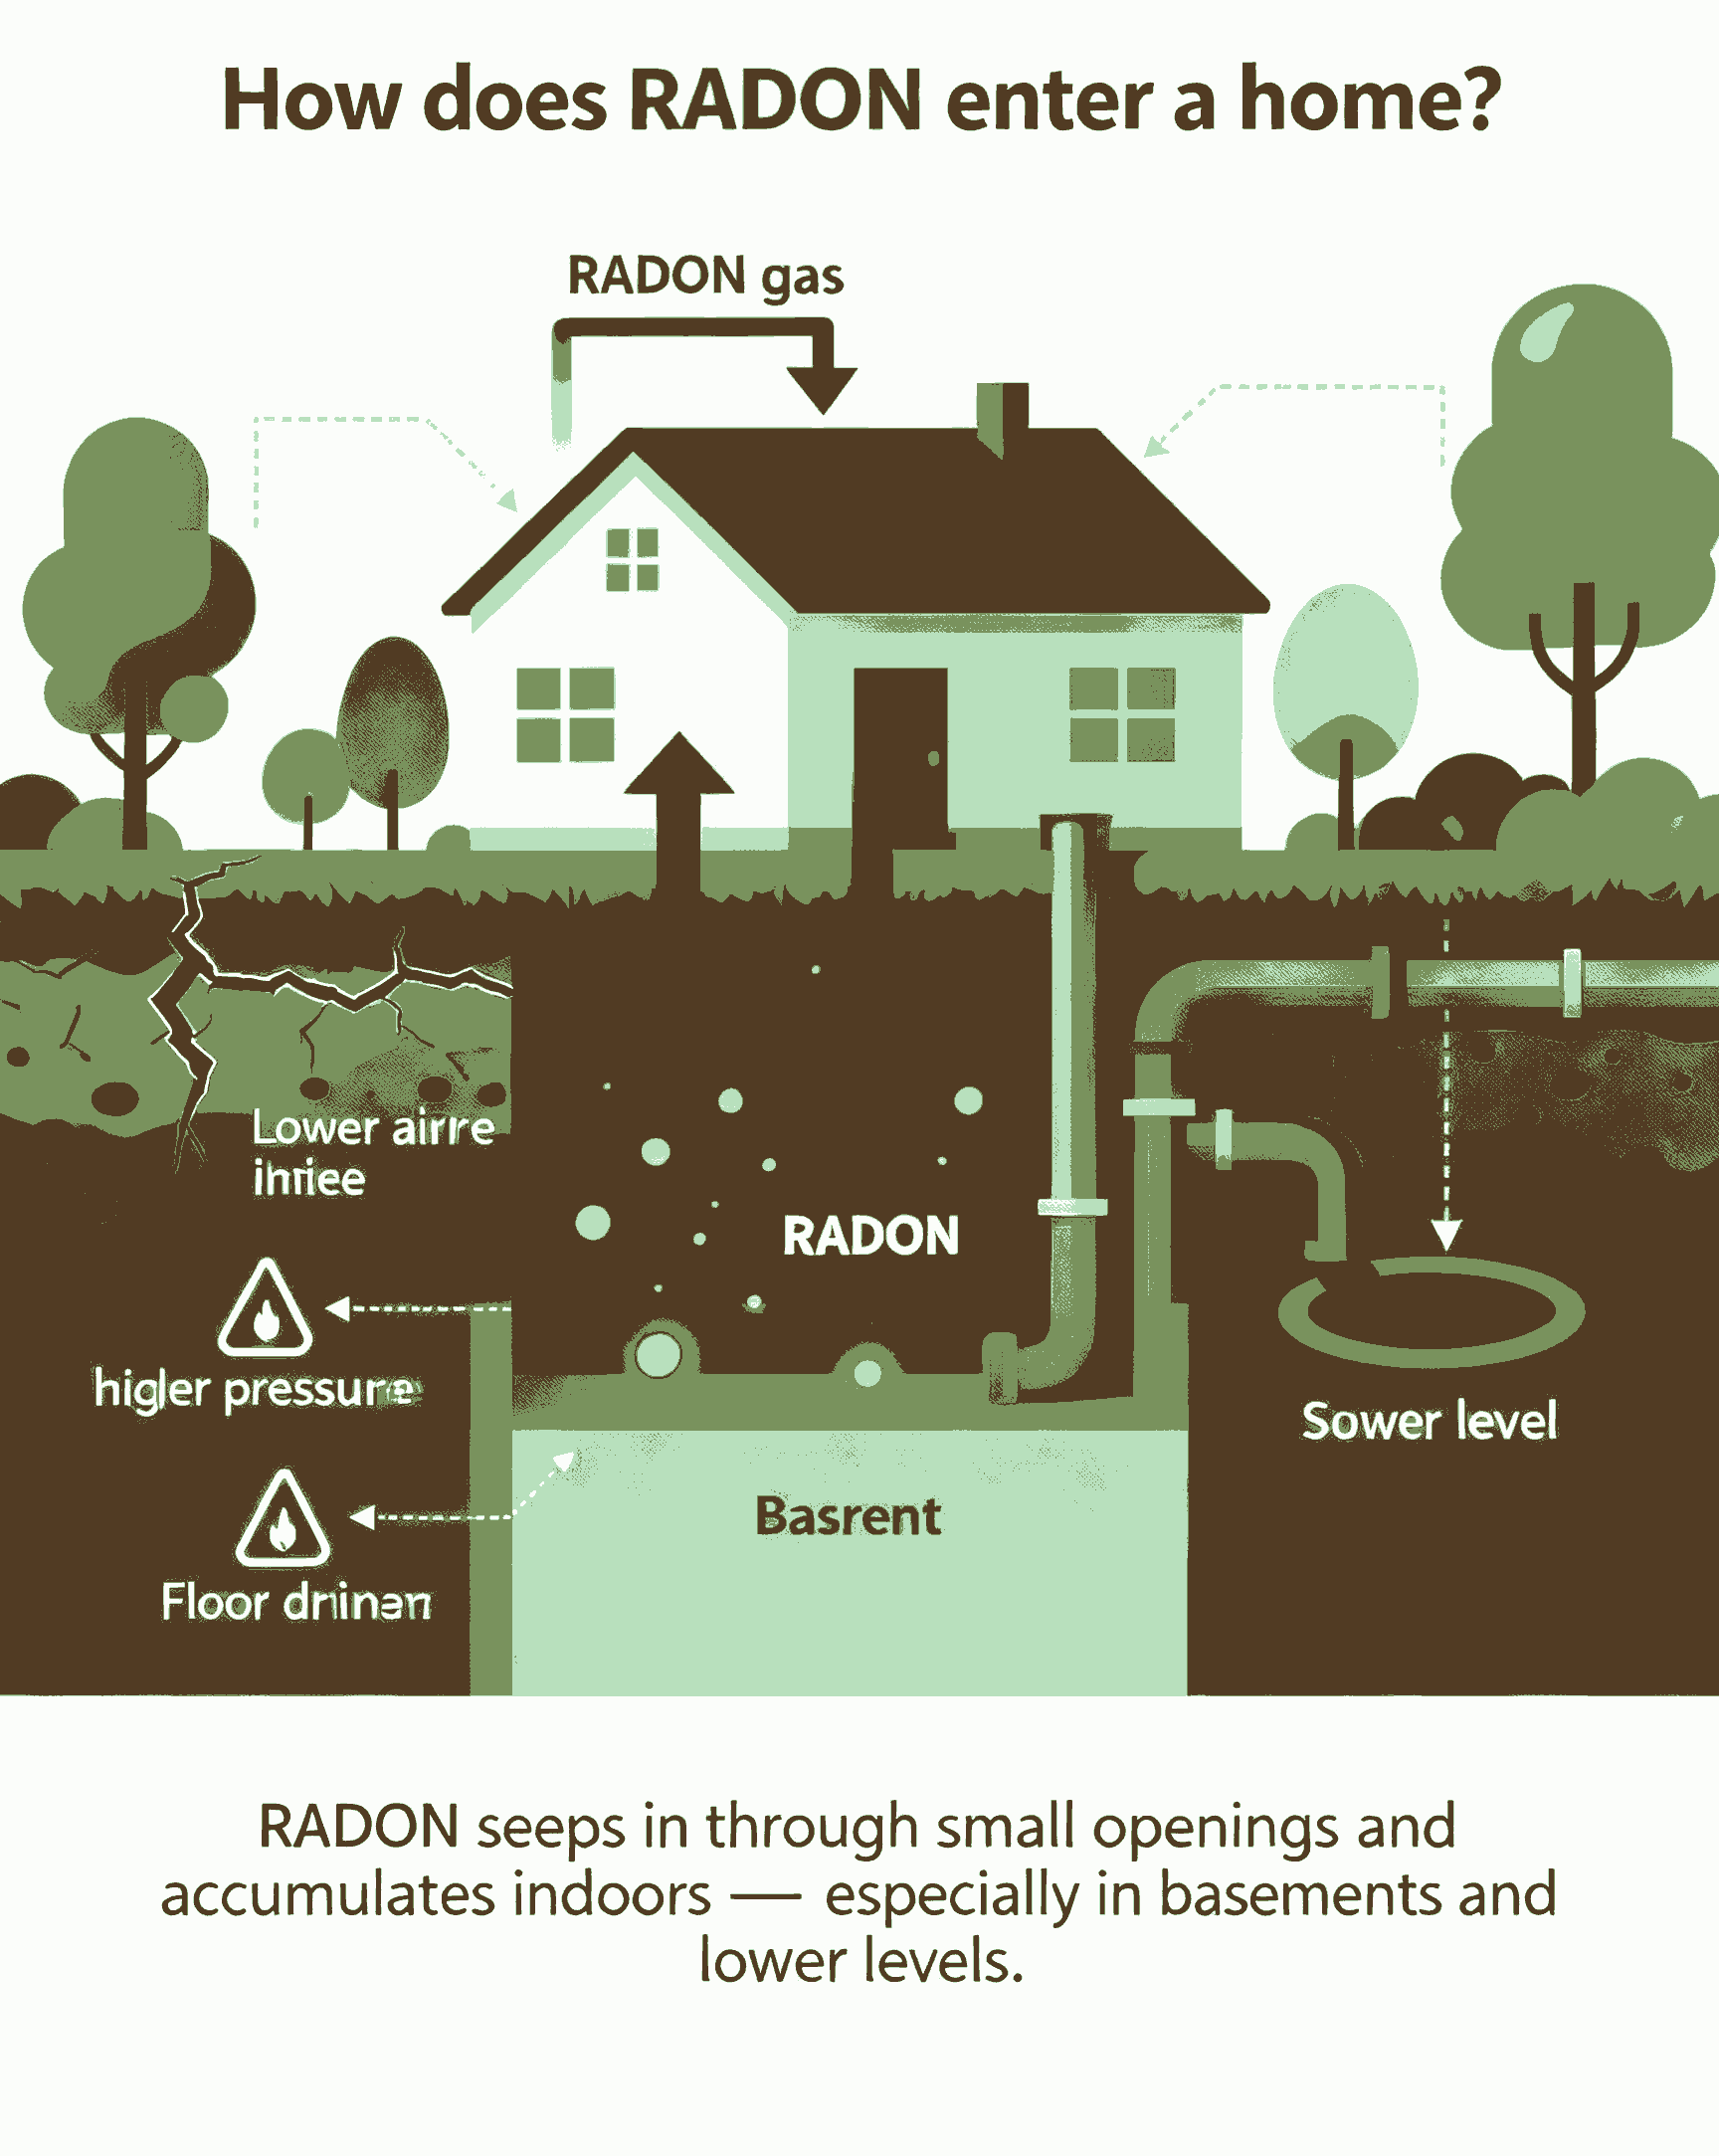
RADON forms naturally in the soil from the decay of uranium and radium. Because the air pressure inside a home is usually lower than the soil pressure, RADON gas is drawn into the building through small openings - such as cracks in the foundation, gaps around pipes, floor drains, and sump pits.
Once inside, RADON can accumulate indoors, especially in basements or lower levels.
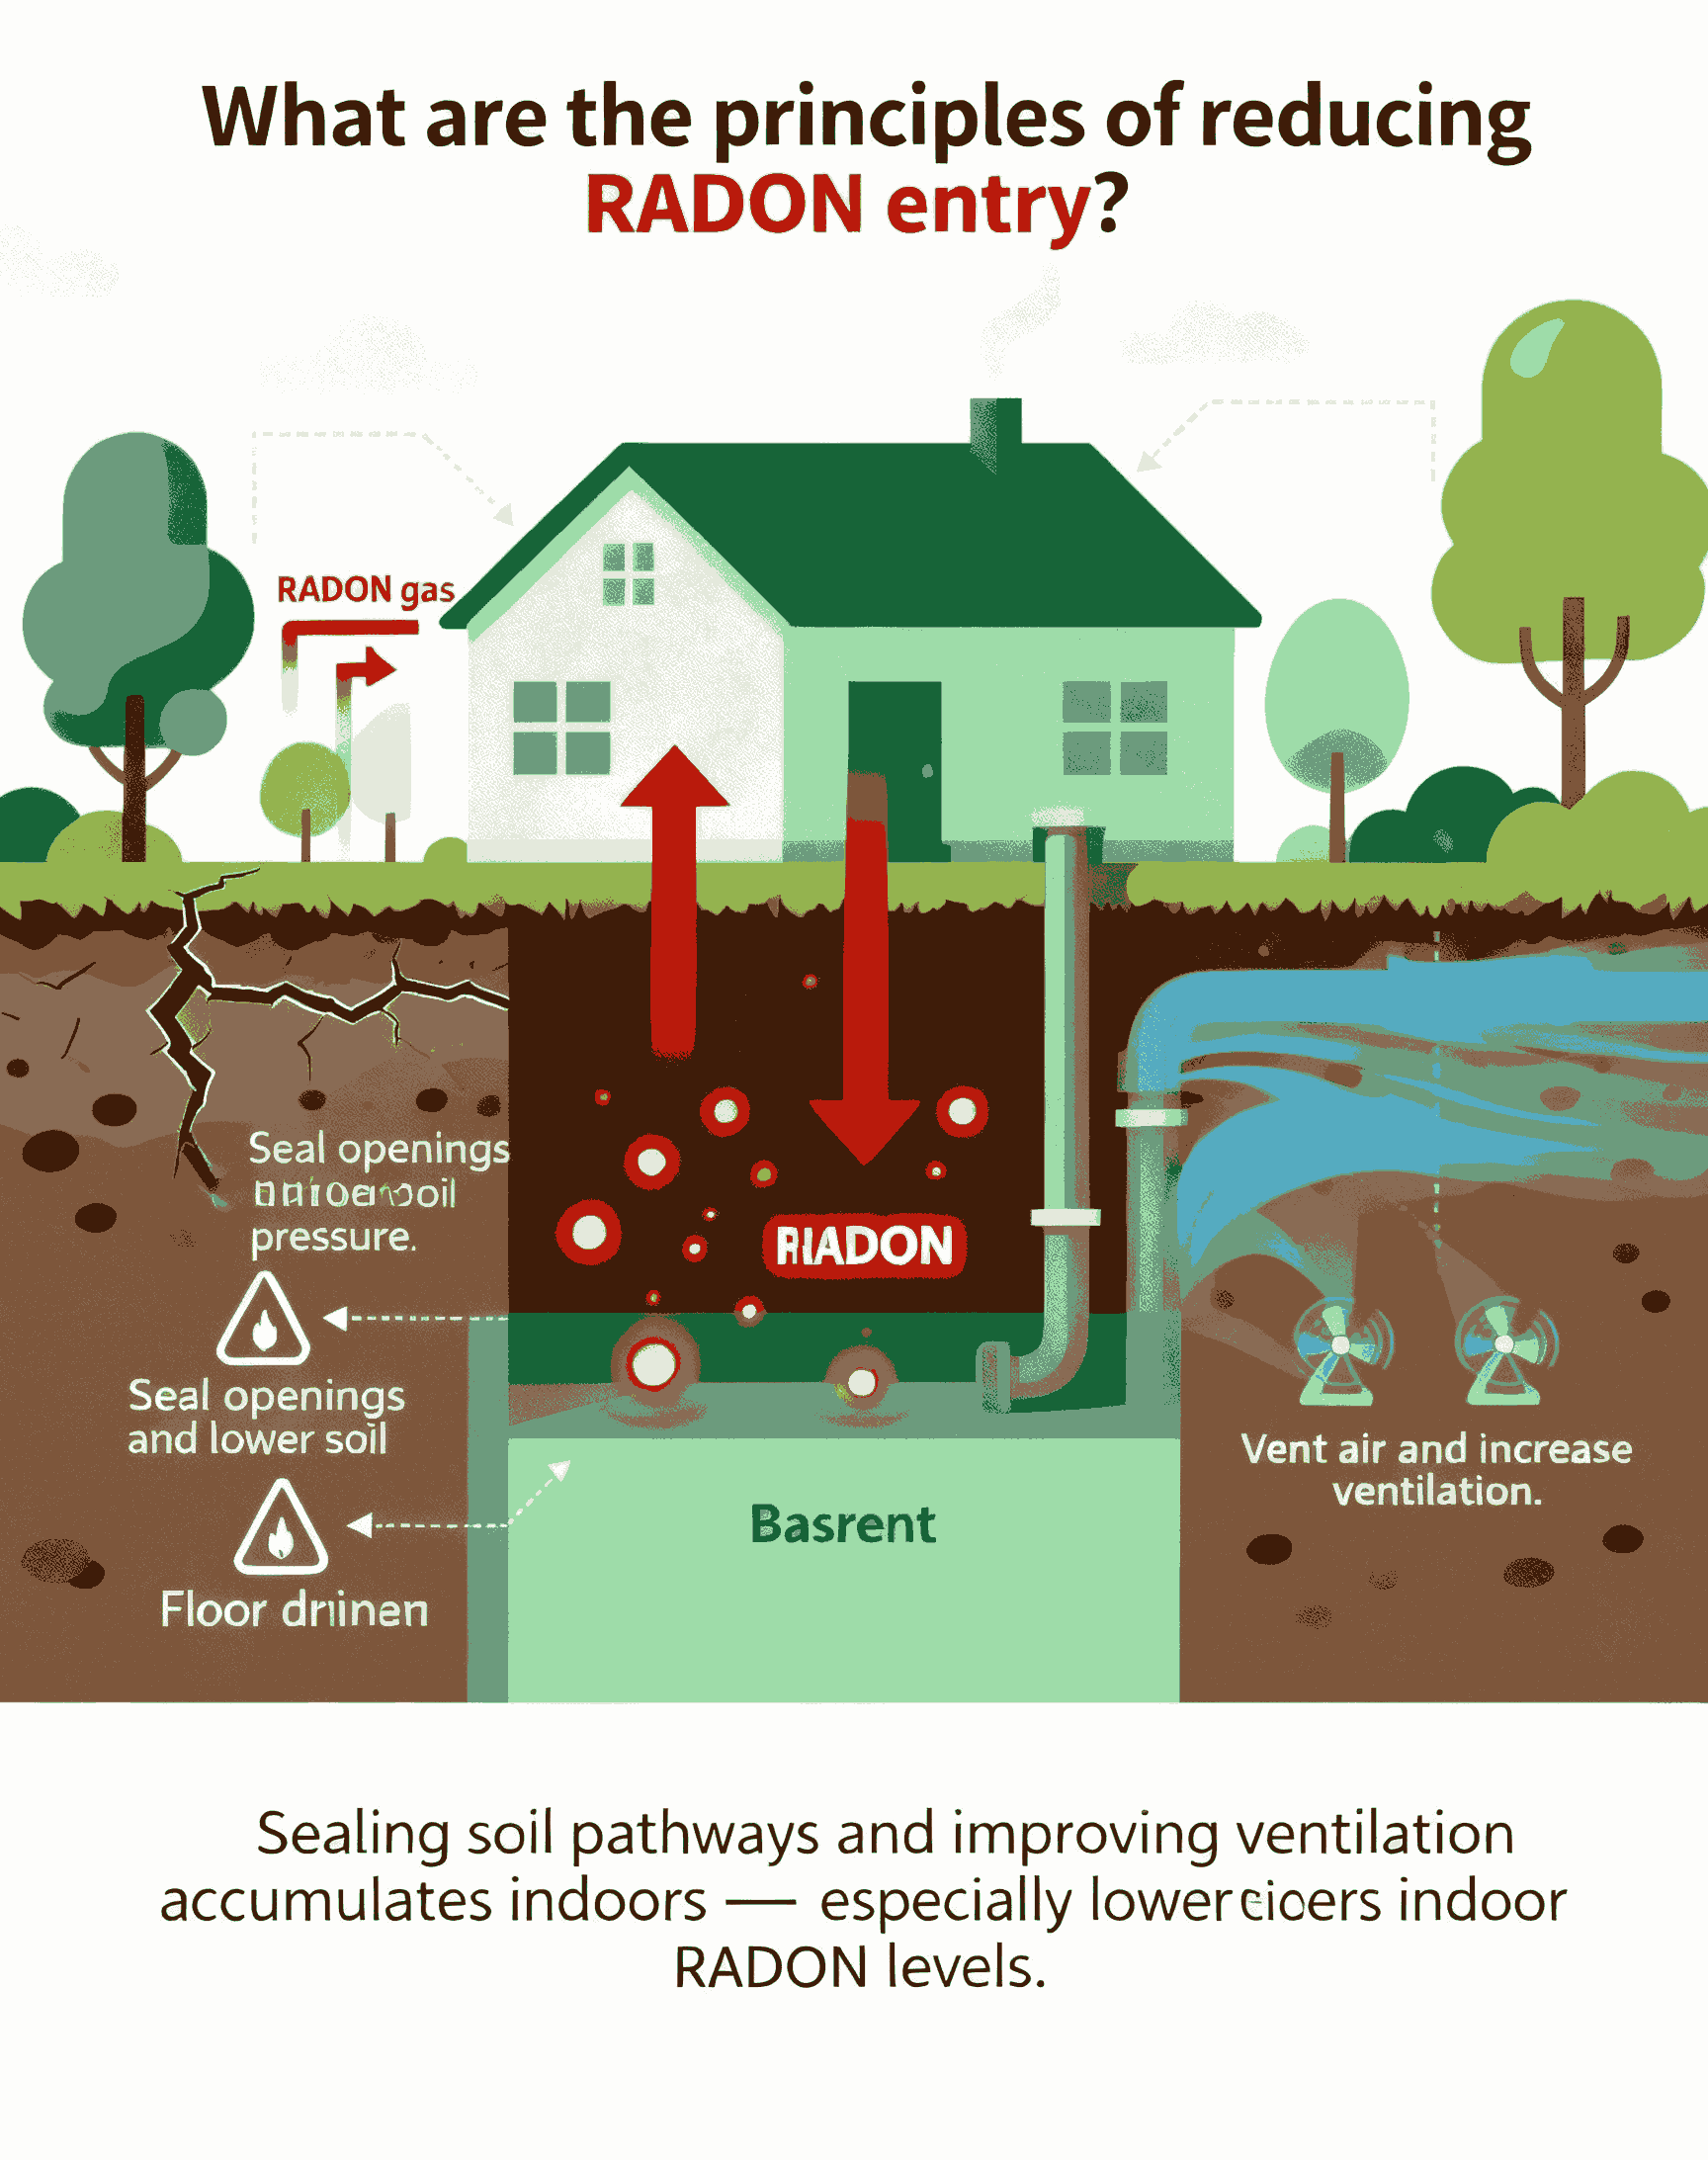
To reduce the amount of RADON entering a building, the goal is to limit the flow of soil gas through the foundation.
This can be achieved by:
- Sealing openings in the foundation that allow soil gas to enter.
- Lowering the air pressure beneath the building or under a membrane so that soil gas no longer flows indoors.
If reducing soil gas flow is not possible, RADON levels can still be lowered by:
- Redirecting air that contains RADON before it reaches the living space and venting it outdoors.
- Increasing ventilation in the living or nearby areas to dilute the RADON concentration.
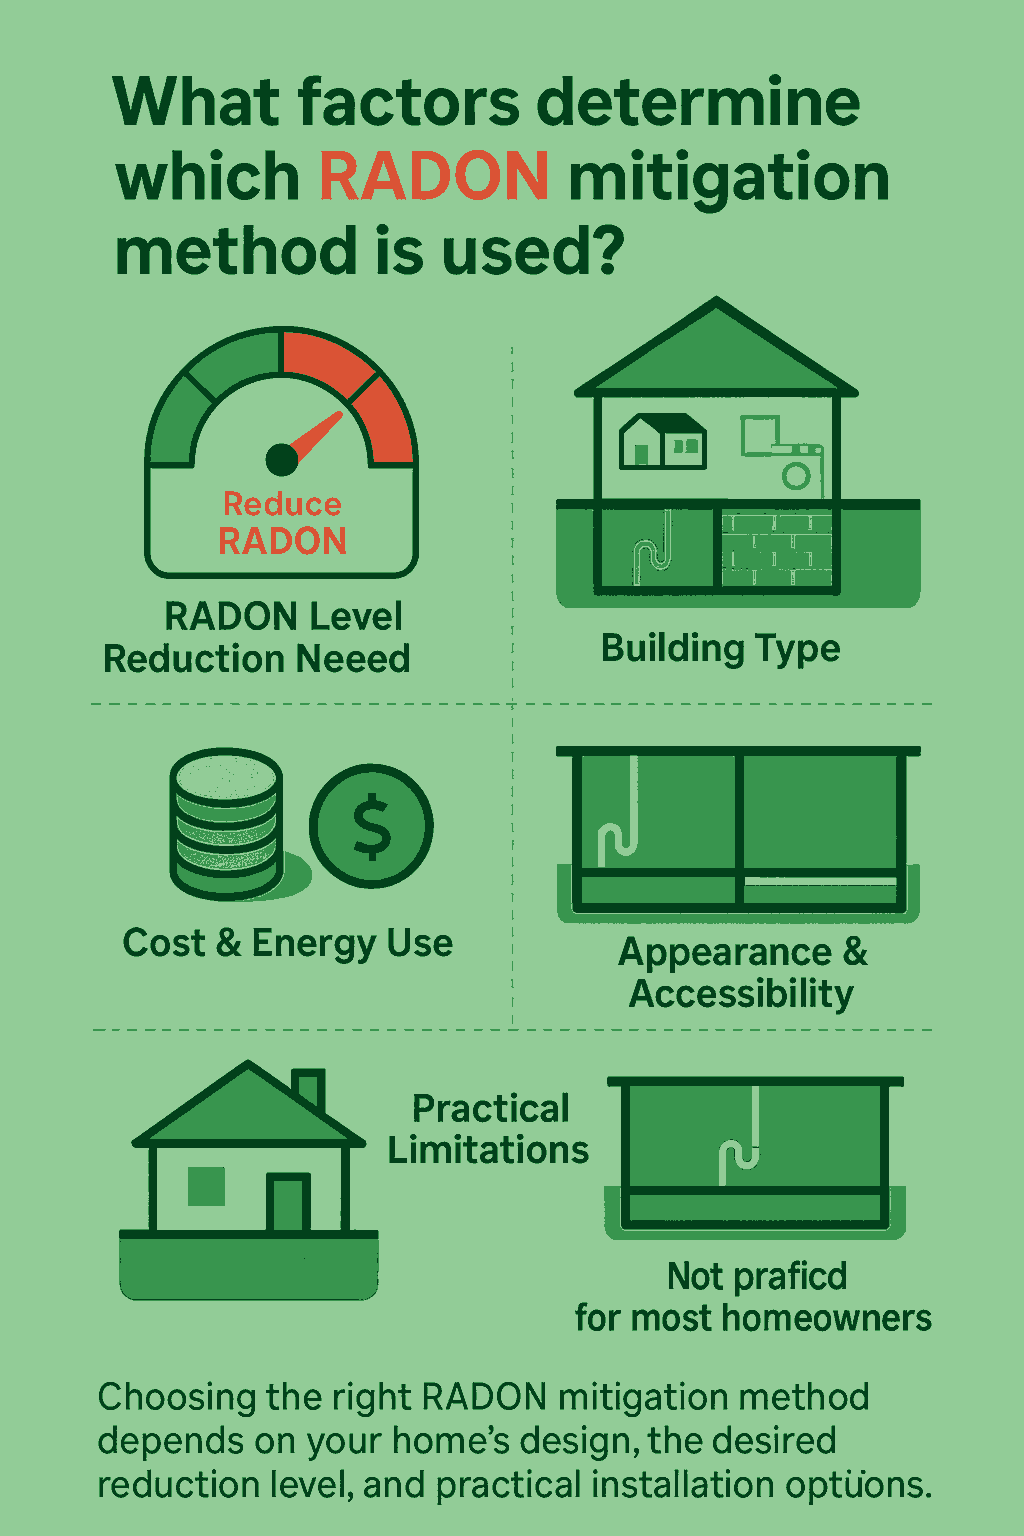
The right RADON mitigation method depends on several factors:
- How much reduction in RADON levels is needed
- The type and condition of the building
- Installation and running (energy) costs
- How visible or disruptive the system will be inside the home
Access to key foundation areas can affect both the ease and cost of installation.
For example, a membrane that works fine in an unused crawlspace may not last in a cellar used for laundry or storage.
A system acceptable in an unfinished utility room might need extra finishing work to fit a finished basement.
Rebuilding the entire foundation with anti-RADON features could stop soil gas entry completely - but this option is rarely practical or affordable for most homeowners.
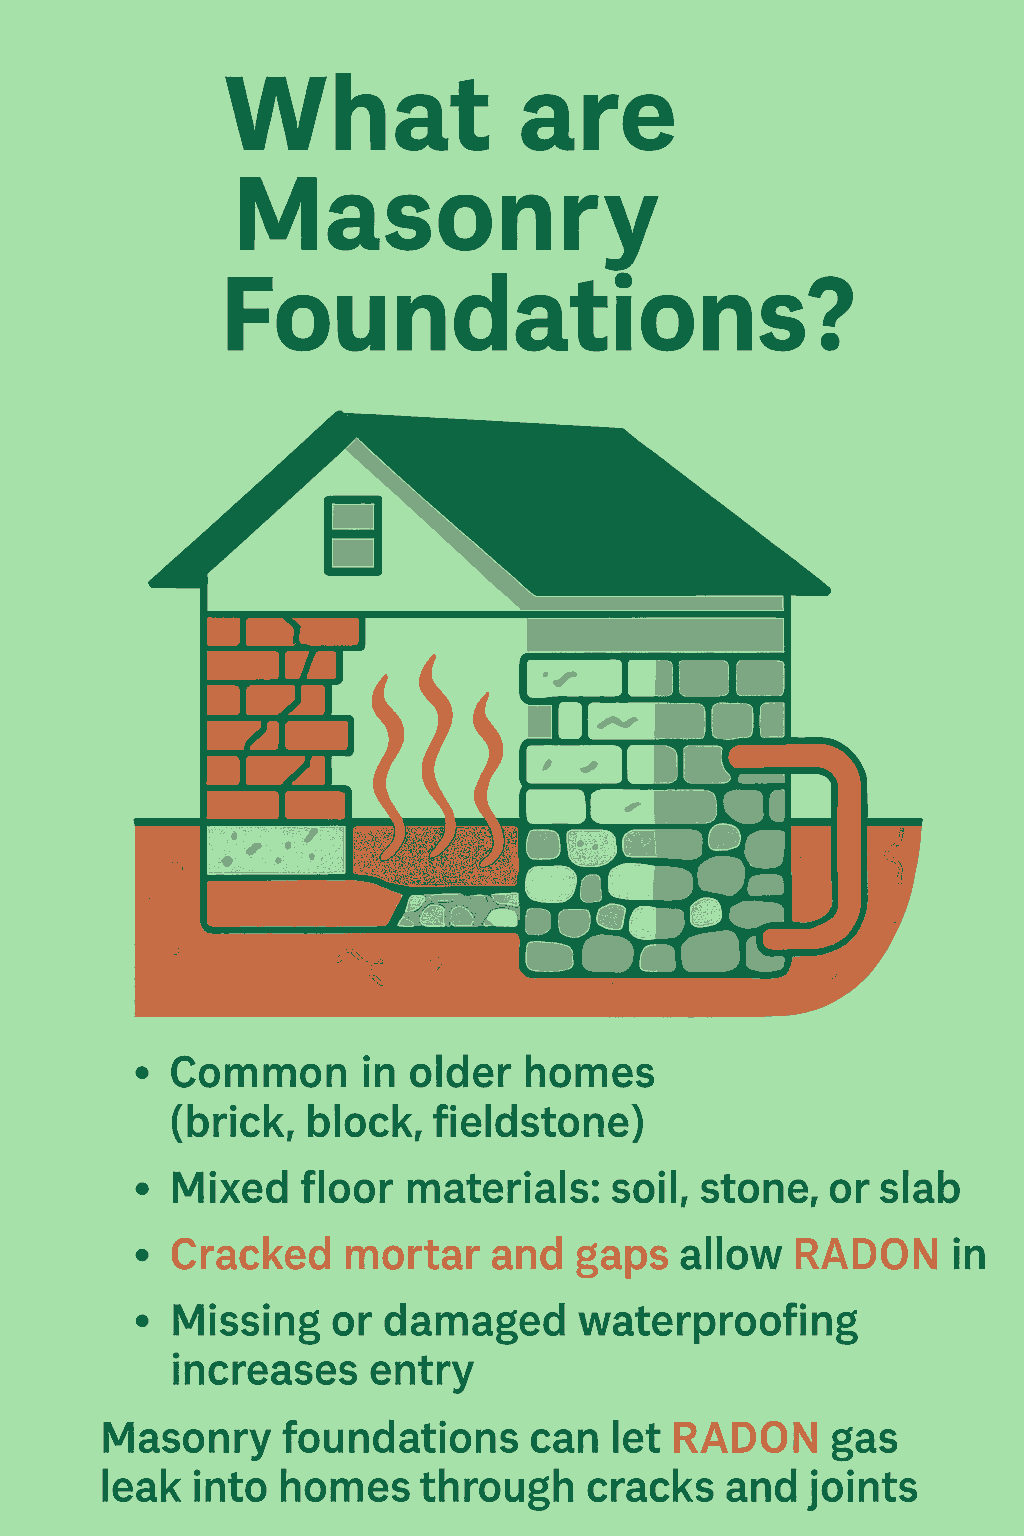
Masonry foundations are built with materials like brick, block, or fieldstone.
They are common in older homes, where building methods were different from today’s standards.
These foundations often have varied floor types - from bare soil or stone, to wood panels or thin concrete slabs poured directly on the ground. Because of this, there are many possible entry points for RADON through cracks, gaps, and joints.
Over time, the mortar between the bricks or stones can crack or deteriorate, allowing soil gas and RADON to leak into the home.
In many cases, exterior waterproofing layers were never applied or have since separated from the wall, creating additional entry paths.
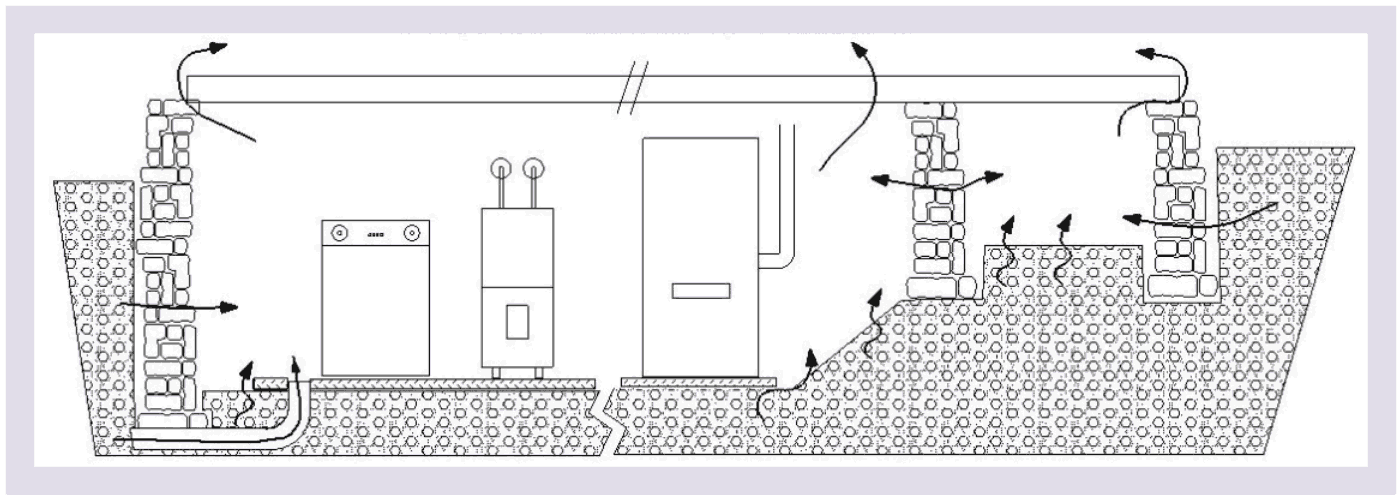
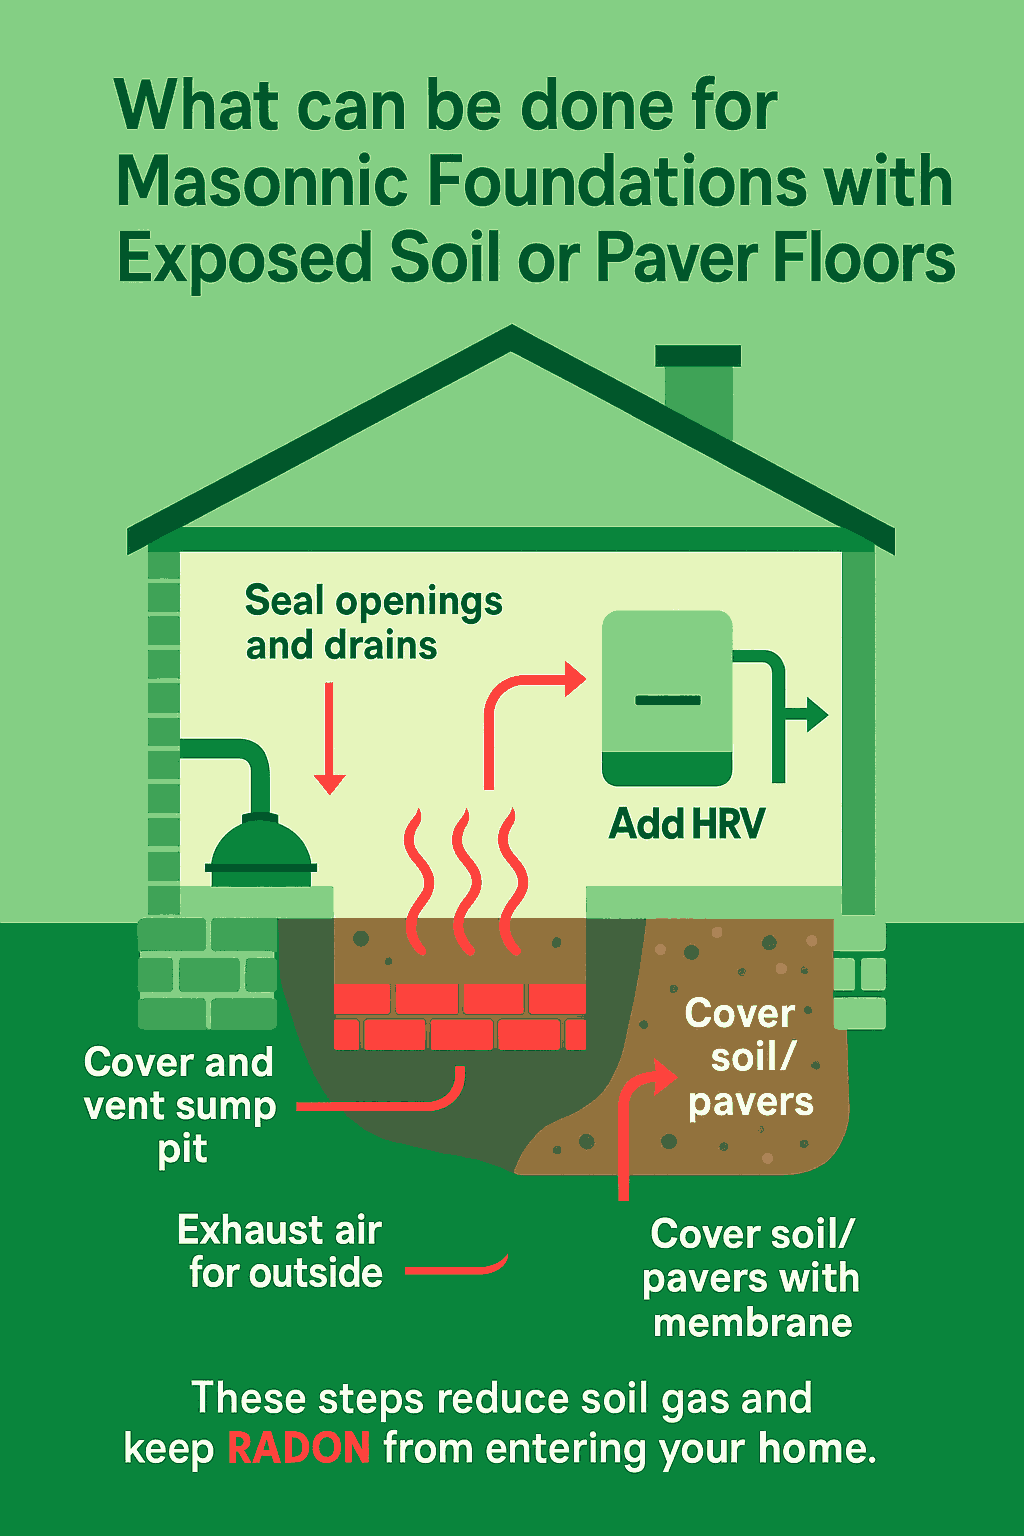
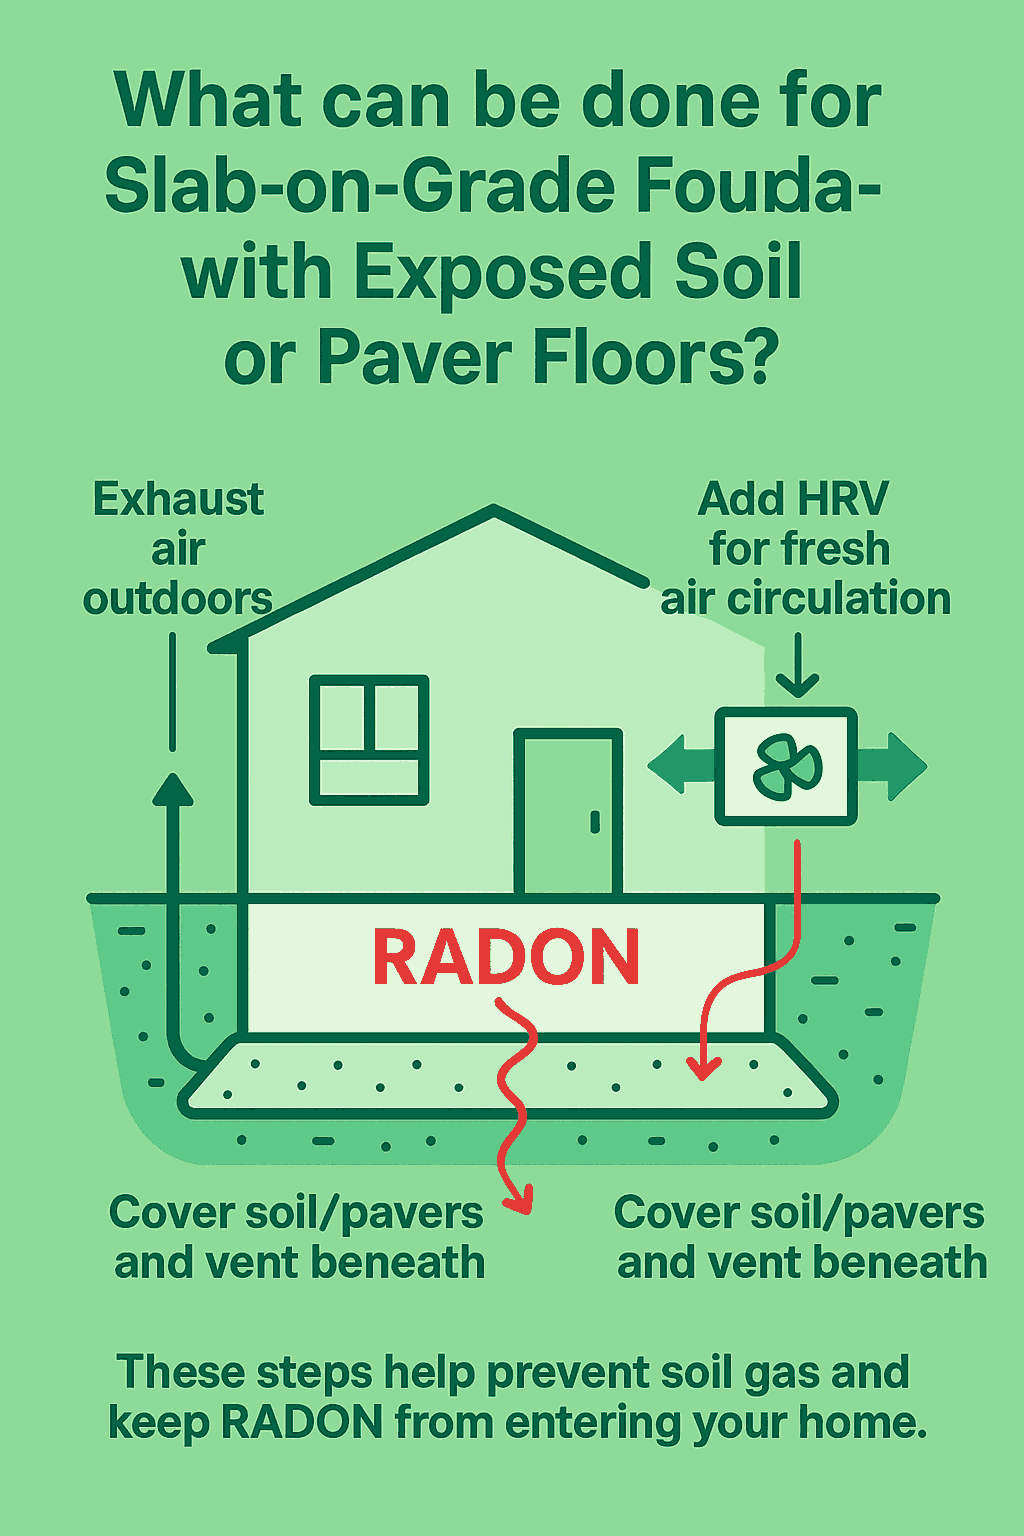
When a masonry foundation has exposed soil or a floor made of pavers, several steps can help reduce RADON entry:
- Seal large openings in any accessible part of the foundation walls or floor.
- Trap and seal floor drains that connect directly to the soil.
- Cover and vent sump pits so that air from them is exhausted outdoors.
- Exhaust foundation air to the outside using proper ventilation.
- Install a Heat Recovery Ventilator (HRV) to bring in fresh air while exhausting basement or crawlspace air outside.
- Cover exposed soil or pavers with a plastic membrane and vent the air beneath it to the outdoors.
These steps help prevent soil gas and RADON from entering the living spaces of your home.
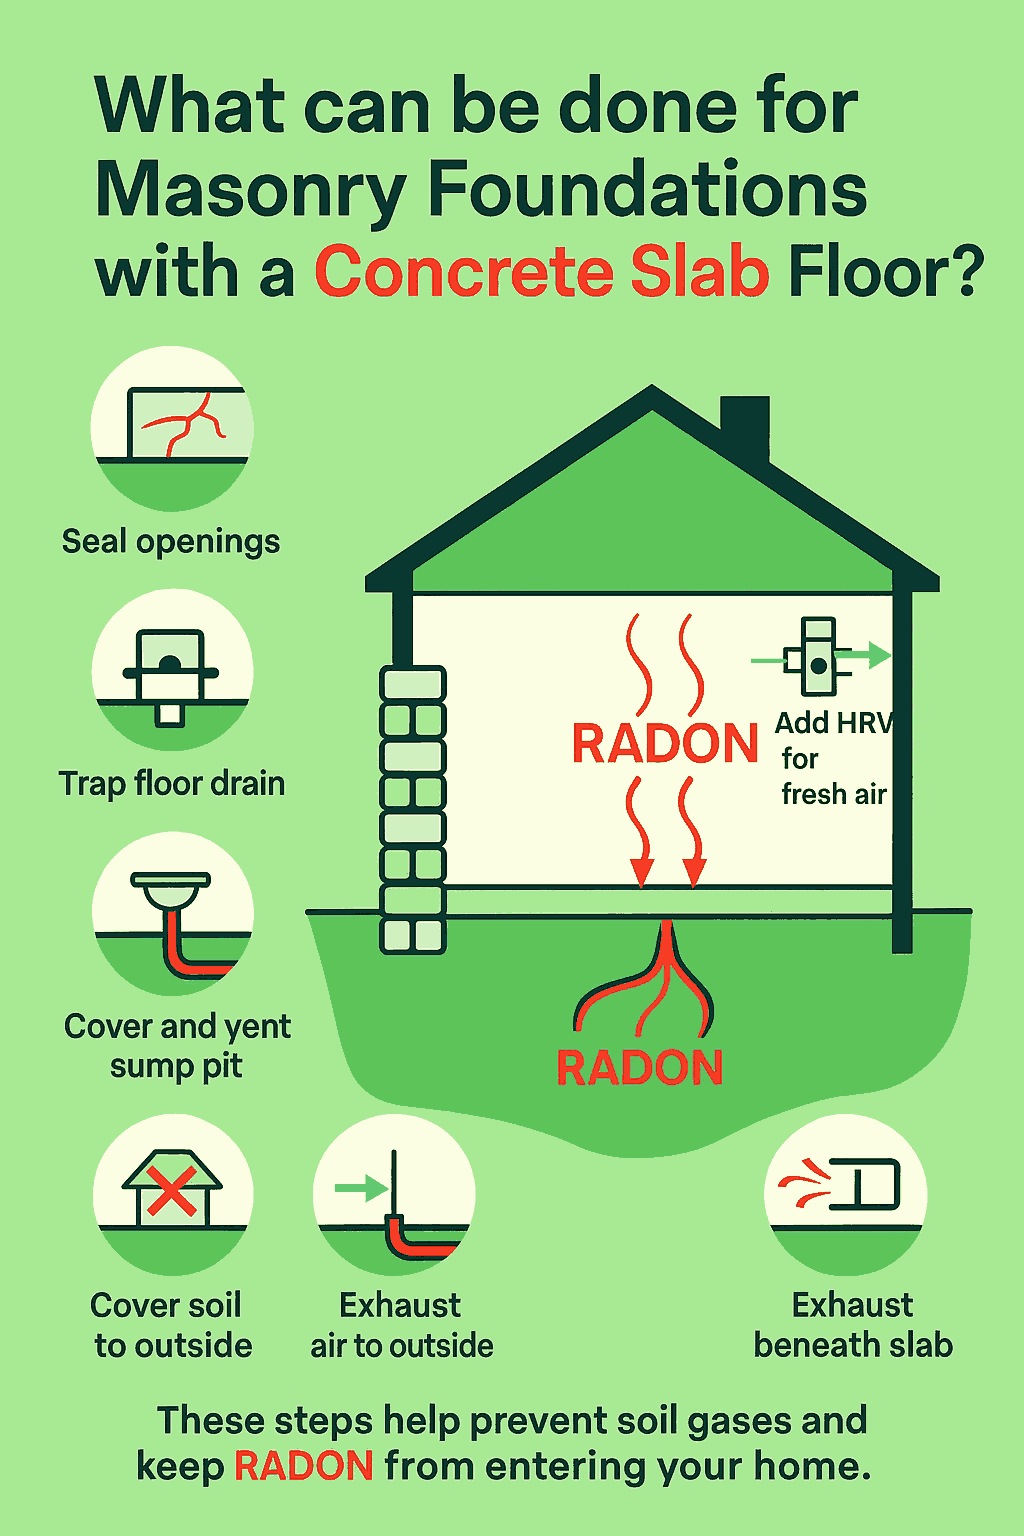
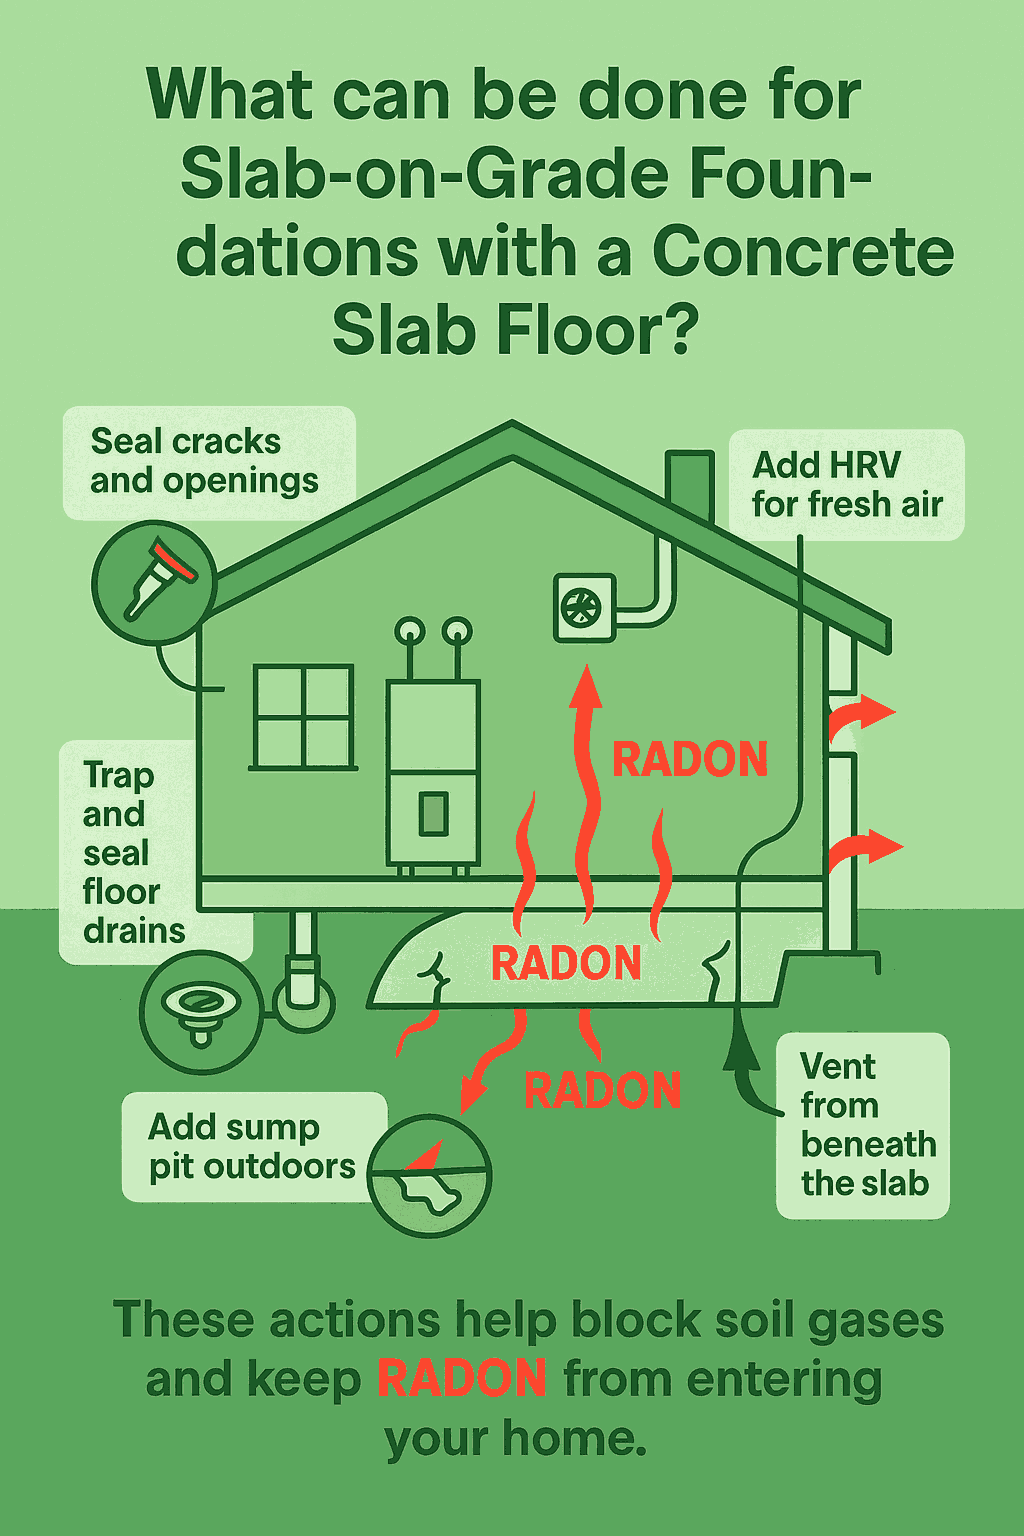
When a masonry foundation has a concrete slab floor, several steps can help reduce RADON entry and improve air quality:
- Seal large openings in accessible areas of the foundation walls or floor.
- Trap and seal floor drains that connect directly to the soil.
- Cover and vent the sump pit so it exhausts air outdoors.
- Ventilate the foundation air by exhausting it outside.
- Install a Heat Recovery Ventilator (HRV) to bring in fresh air and remove basement air efficiently.
- Vent air from beneath the concrete slab to the outside to reduce trapped RADON gas.
These steps help prevent soil gases and RADON from entering your living space.
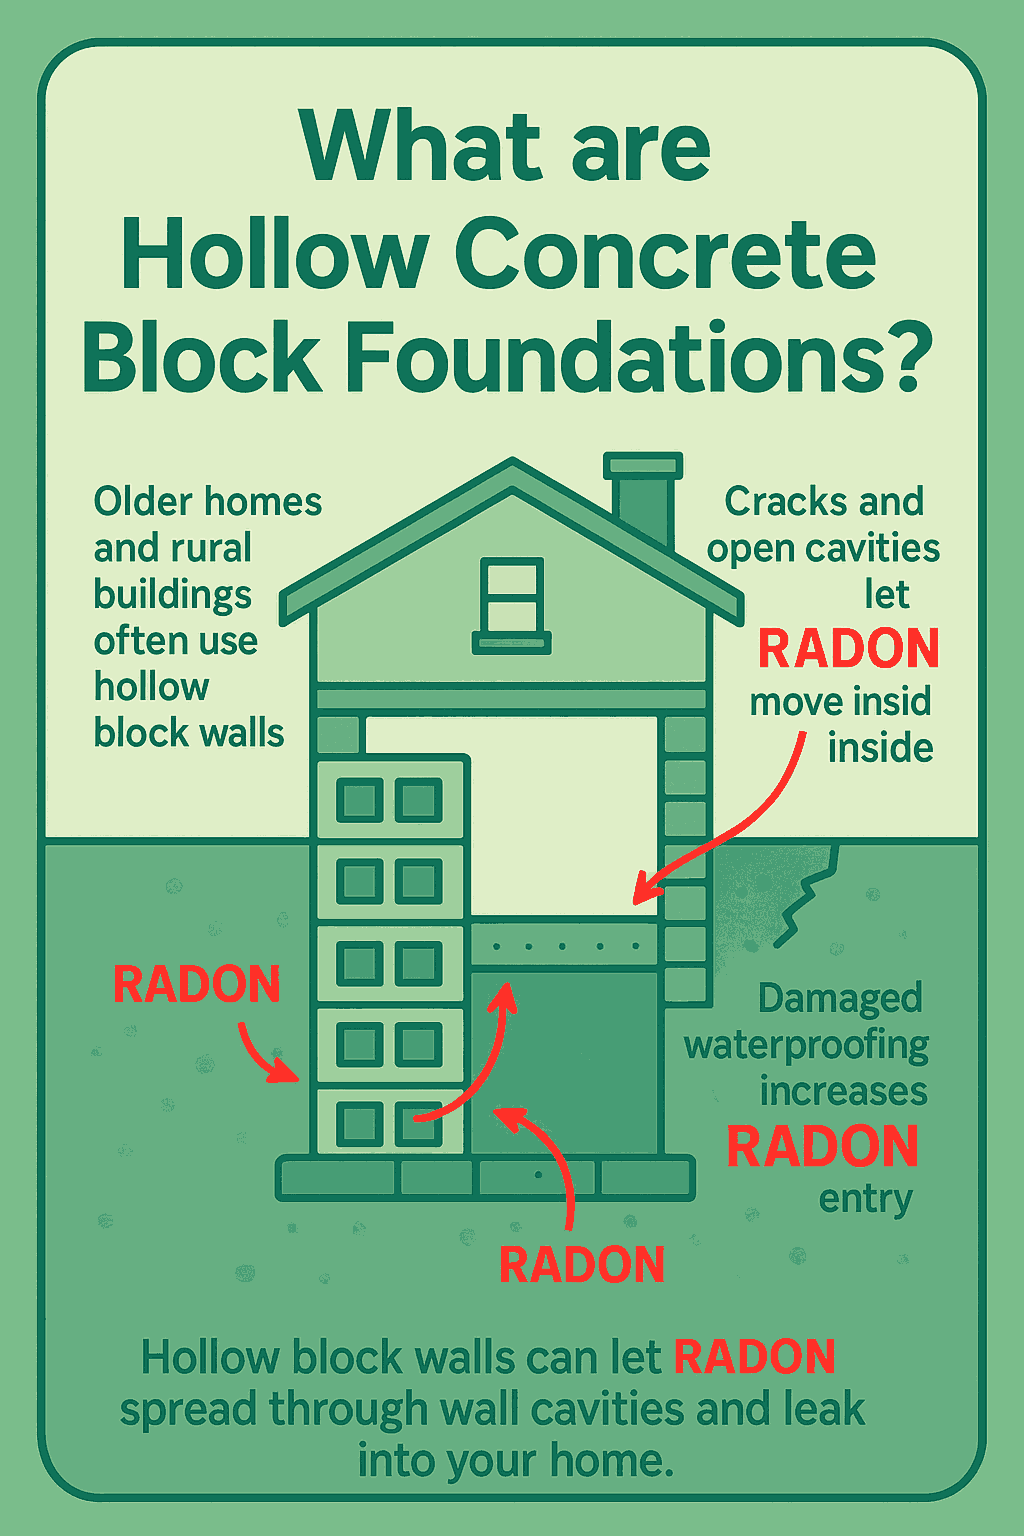
Hollow concrete block foundations are common in older homes and rural areas built before concrete was widely available.
These walls are made of hollow blocks with internal cavities that can allow RADON gas to move freely inside them.
Even if floor cracks are sealed, RADON can still enter the home through:
- Cracks or openings in the inner wall surface,
- Deteriorated or missing exterior waterproofing layers, and
- Open cavities at the top of the wall.
Because all the hollow spaces inside the blocks are connected, RADON entering one area can spread through the entire wall and leak into the home.
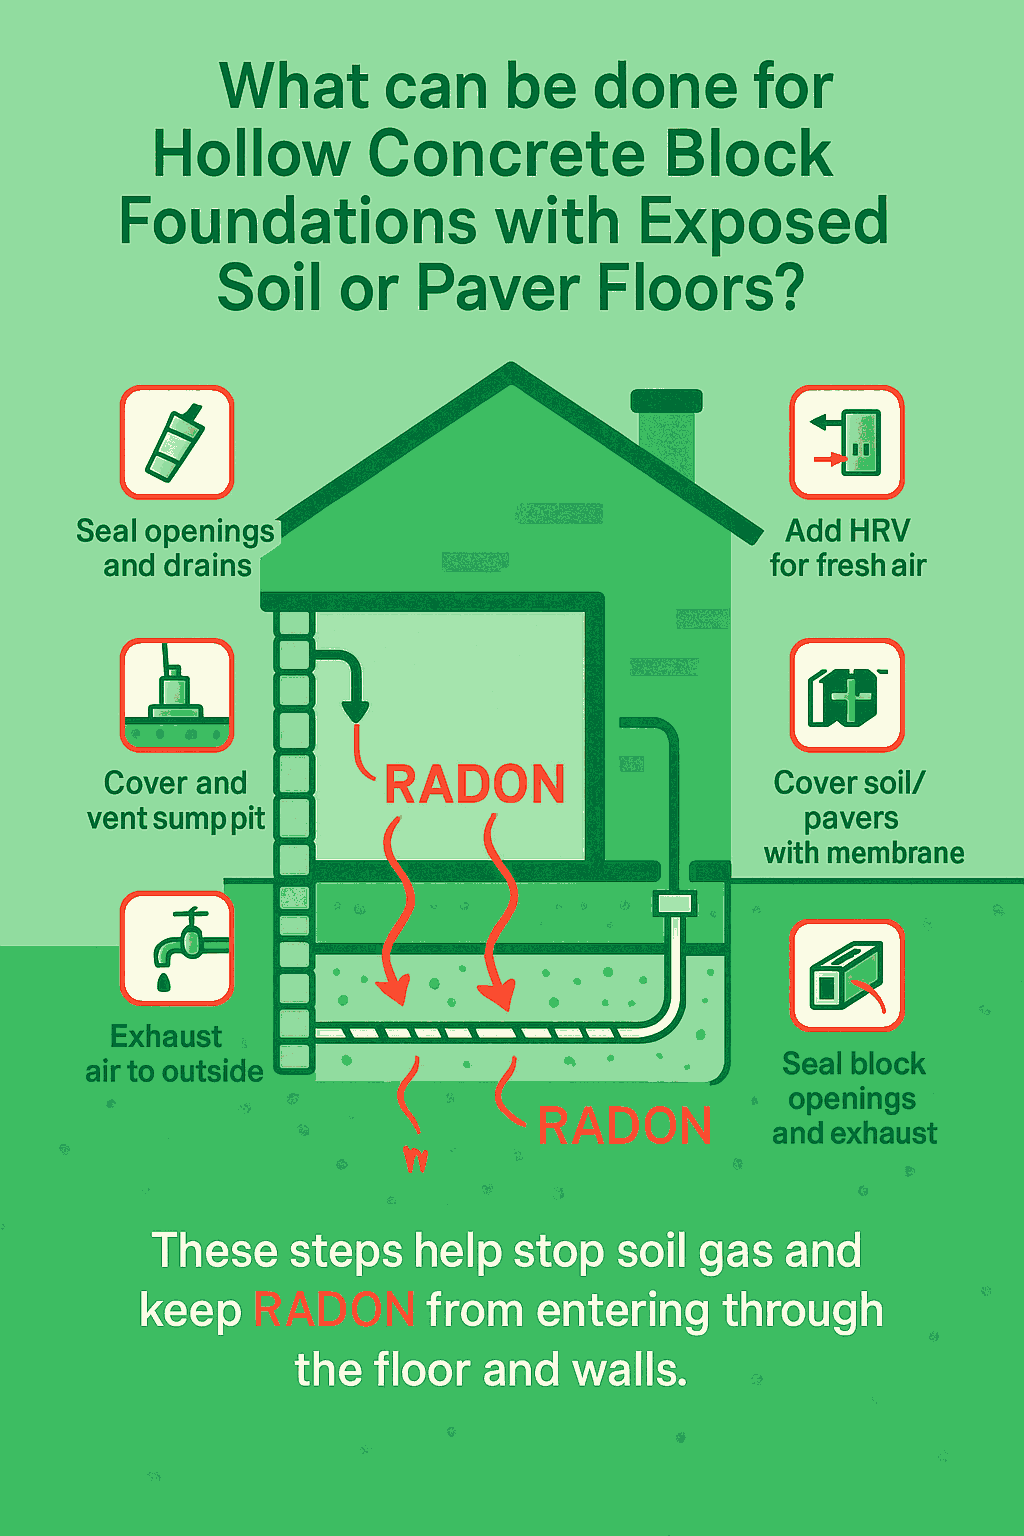
When a hollow concrete block foundation has exposed soil or a paver floor, several steps can help reduce RADON entry:
- Seal large openings in the foundation walls and floor where soil is visible.
- Trap and seal floor drains that connect directly to the ground.
- Cover and vent the sump pit to exhaust air outdoors.
- Ventilate the foundation air by exhausting it outside.
- Install a Heat Recovery Ventilator (HRV) to bring in fresh air and remove basement air efficiently.
- Cover exposed soil or pavers with a plastic membrane and vent the air beneath it to the outside.
- Seal block wall openings and vent the hollow wall cavities to the outdoors.
These measures help prevent soil gas and RADON from entering your home through both the floor and the walls.
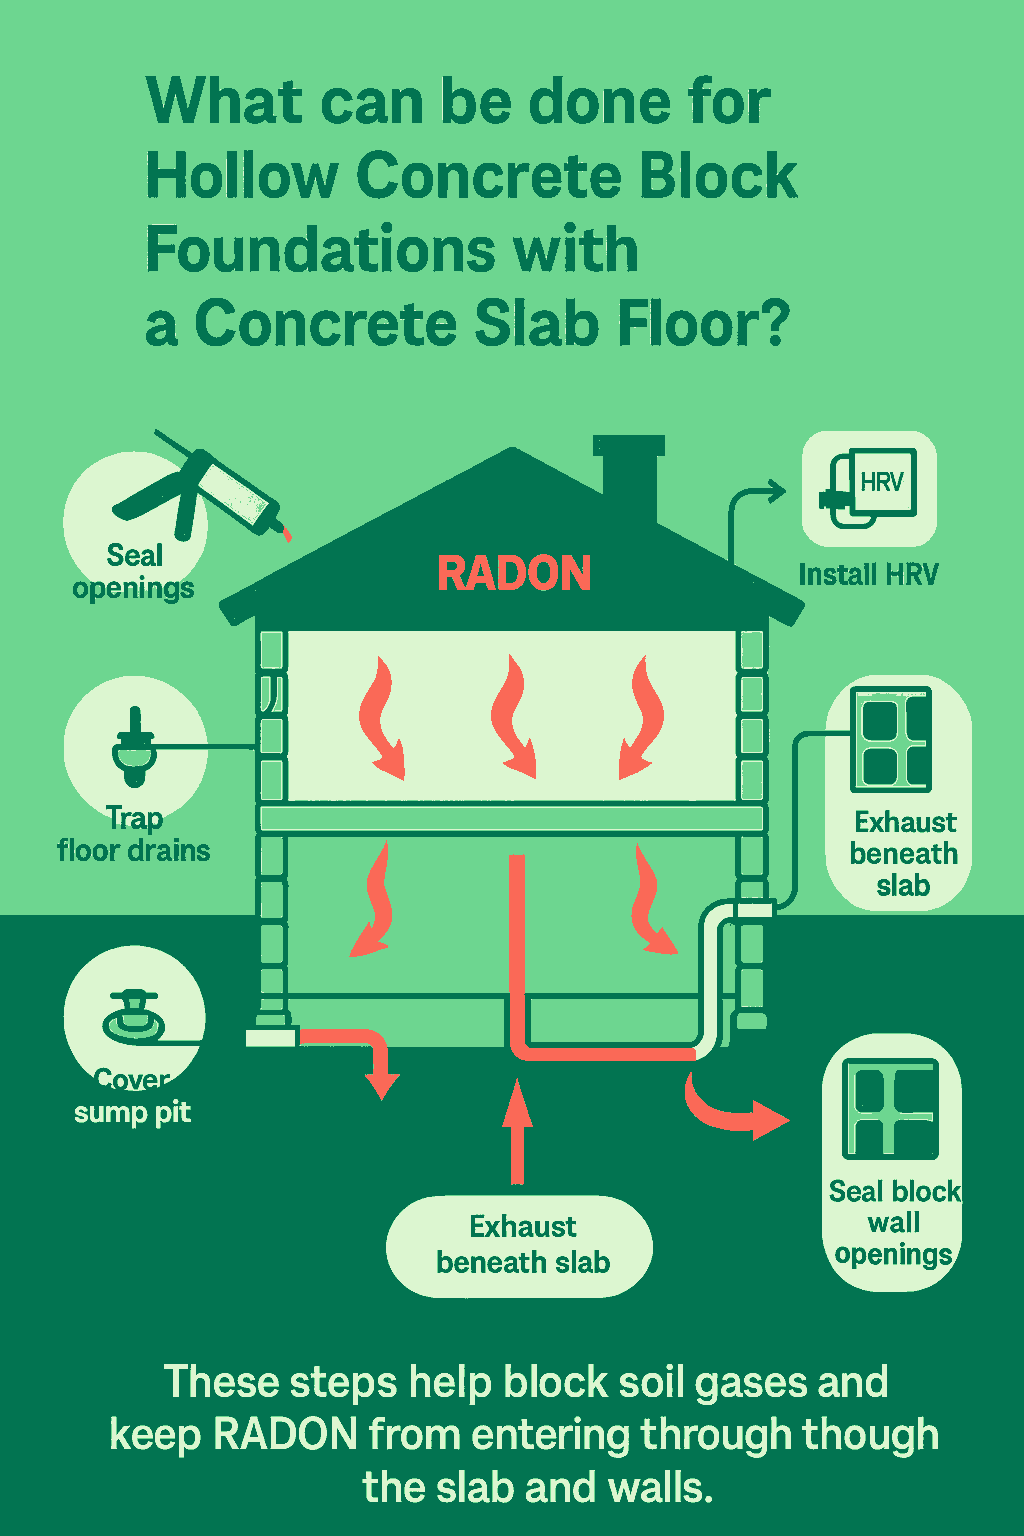
When a hollow concrete block foundation has a concrete slab floor, several steps can help reduce RADON entry and improve air quality:
- Seal large openings in the foundation walls and floor where soil contact is possible..
- Trap and seal floor drains that connect directly to the ground.
- Cover and vent the sump pit so that air is exhausted outdoors.
- Exhaust foundation air to the outside to prevent buildup.
- Install a Heat Recovery Ventilator (HRV) to bring in fresh air and exhaust basement air efficiently.
- Vent air from beneath the concrete slab to the outdoors to reduce trapped RADON gas.
- Seal block wall openings leading to the interior and vent hollow wall cavities to the outside.
These steps help prevent soil gases and RADON from entering your home through both the slab and block walls.
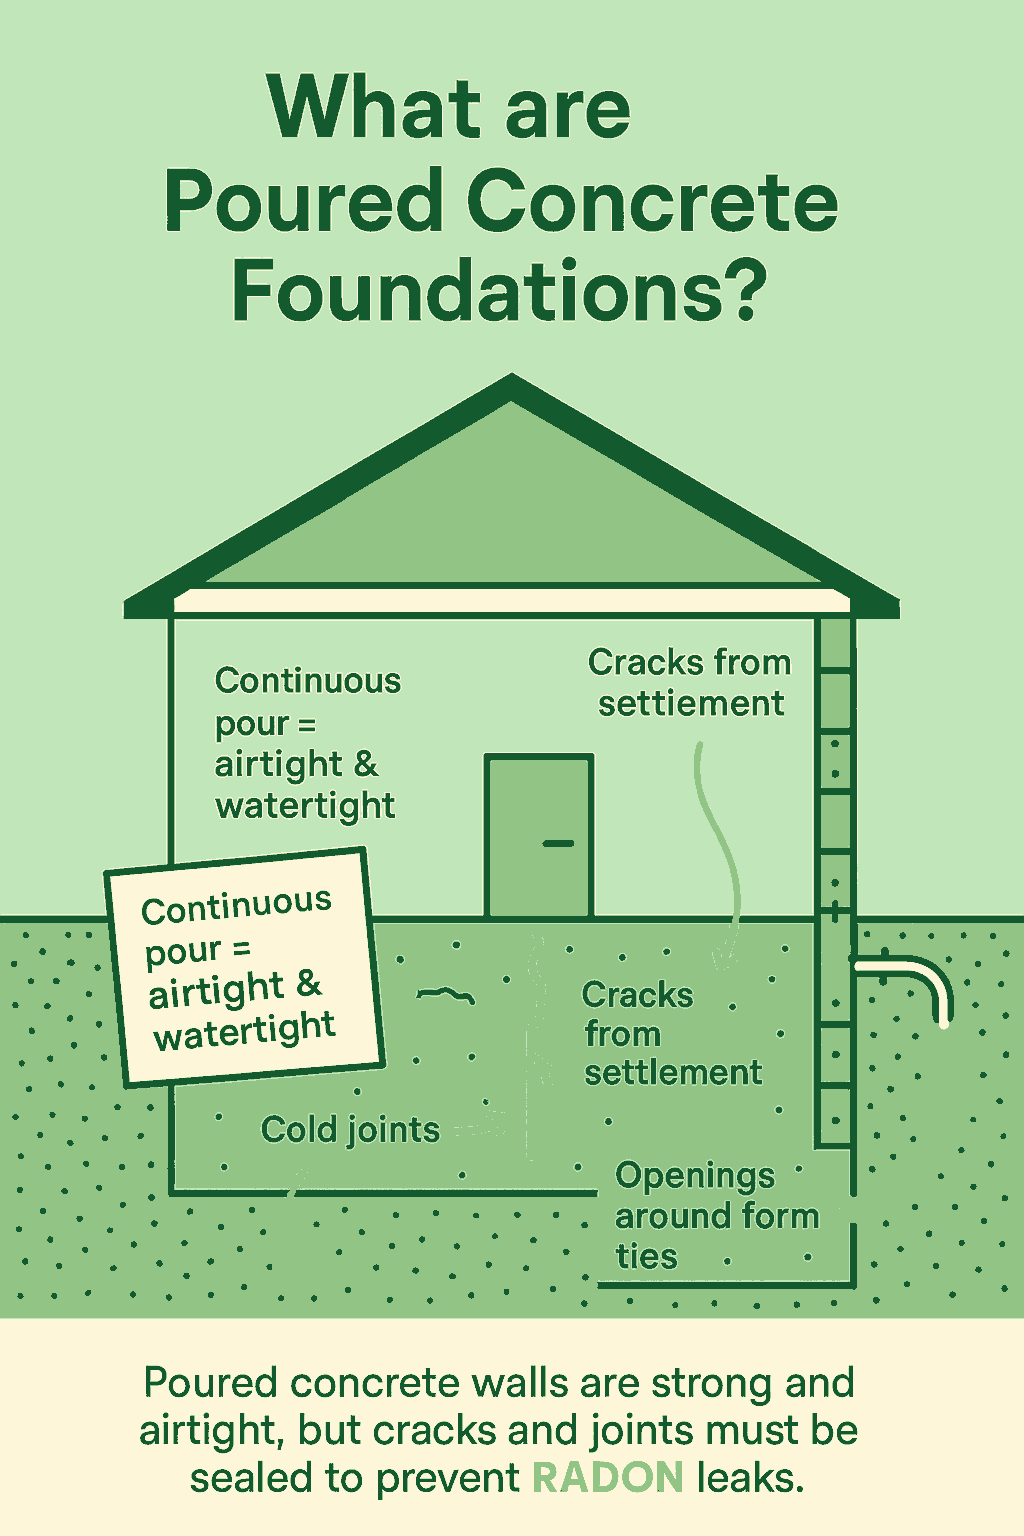
Poured concrete foundation walls are common in modern homes, especially in urban and suburban areas.
They are typically built in one continuous pour, which makes them strong, airtight, and watertight.
However, cracks or openings can form over time due to:
- Settlement or ground movement
- “Cold joints” where the pour was interrupted
- Small gaps around form ties
These issues are easy to spot and can usually be sealed using standard waterproofing methods to prevent air and RADON leaks.
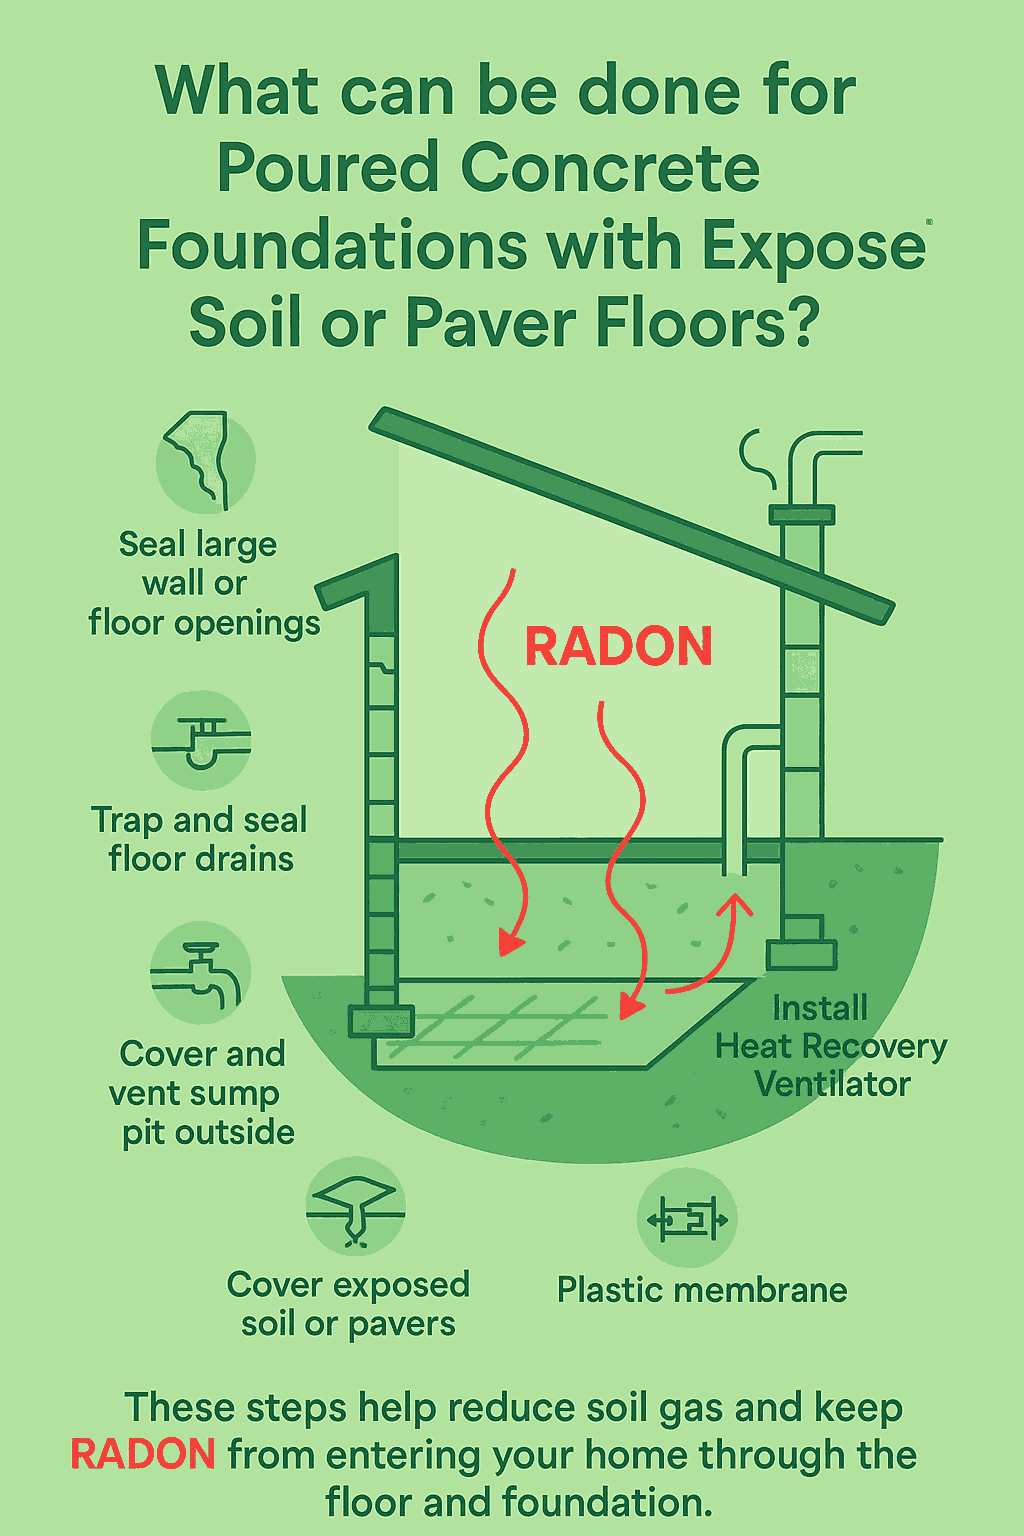
When a poured concrete foundation has exposed soil or paver flooring, several actions can help reduce RADON entry and improve air quality:
- Seal large openings in any accessible part of the foundation walls or floor.
- Trap and seal floor drains that lead directly to the soil.
- Cover and vent sump pits so air is exhausted outside.
- Ventilate the foundation air by exhausting it outdoors.
- Install a Heat Recovery Ventilator (HRV) to supply fresh air to the living space while removing basement air.
- Cover exposed soil or pavers with a plastic membrane and vent the air beneath it to the outdoors.
These steps help control soil gas and prevent RADON from entering your home through the floor and foundation.
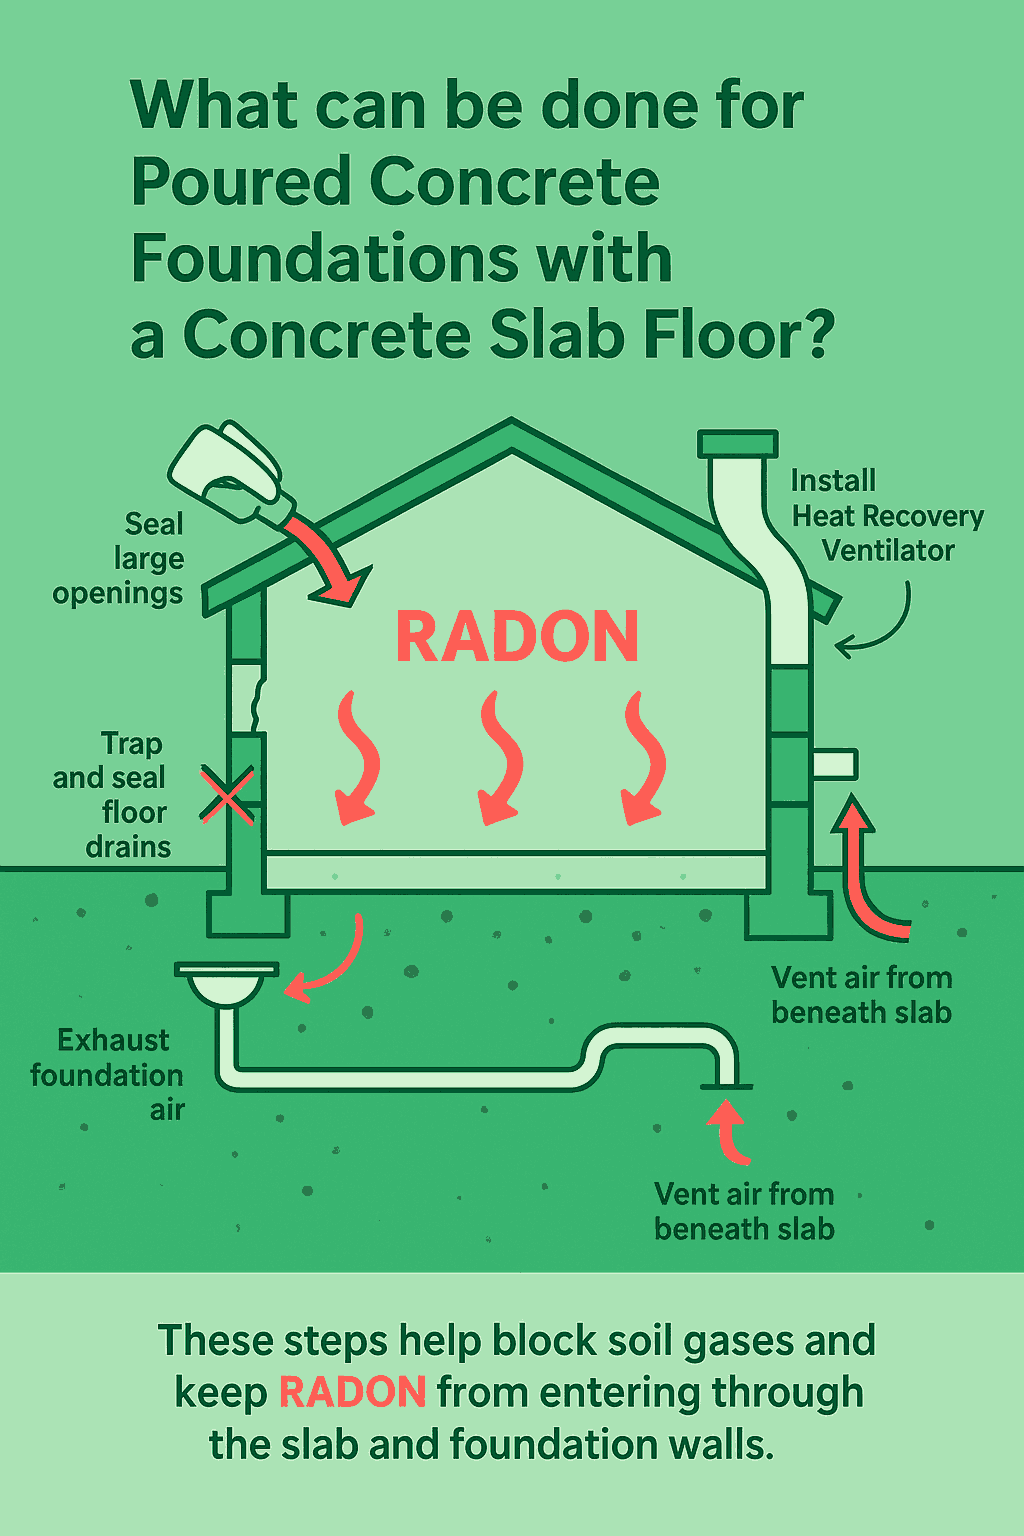
When a poured concrete foundation has a concrete slab floor, several actions can help reduce RADON entry and improve air quality:
- Seal large openings in any accessible parts of the foundation walls or floor.
- Trap and seal floor drains that connect directly to the soil.
- Cover and vent sump pits so that air is exhausted outside.
- Ventilate the foundation air by exhausting it outdoors.
- Install a Heat Recovery Ventilator (HRV) to bring in fresh air and exhaust basement or crawlspace air.
- Vent air from beneath the concrete slab to the outside to remove trappedRADON gas.
These steps help block soil gases and keep RADON from entering your home through the slab and foundation walls.
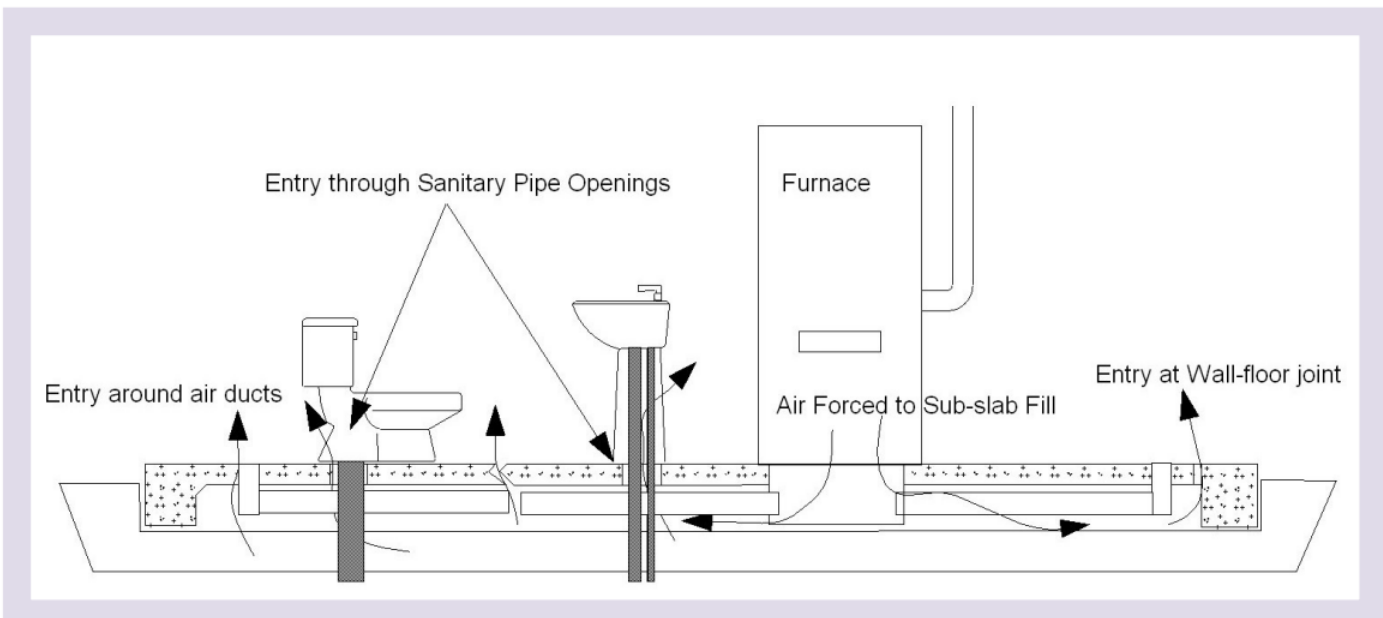
Slab-on-grade foundations are built directly on the ground, without a basement or crawlspace. They are common in areas where bedrock is close to surface or the water table is high, making deep foundations impractical.
In homes with forced-air heating or cooling systems, ductwork may be installed above or below the slab.
If the system leaks air from ducts above the slab, it can create negative pressure indoors, pulling RADON gas through any cracks or openings in the slab.
Proper sealing and ventilation help prevent RADON from entering through the floor and maintain healthy indoor air quality.

When a slab-on-grade foundation has exposed soil or paver flooring, a few key steps can help reduce RADON entry and improve air quality:
- Ventilate the foundation area by exhausting air to the outside.
- Install a Heat Recovery Ventilator (HRV) to bring in fresh air to the living space while exhausting foundation air outdoors.
- Cover exposed soil or pavers with a durable plastic membrane and vent the air beneath it to the outside.
These measures help prevent soil gases and RADON from entering your home and keep indoor air clean and safe.
When a home has a slab-on-grade foundation with a concrete floor, a few key steps can help reduce RADON entry and improve indoor air quality:
- Seal large openings in any accessible part of the floor or foundation walls.
- Trap and seal floor drains that connect directly to the soil.
- Cover and vent sump pits to exhaust air outdoors.
- Install a Heat Recovery Ventilator (HRV) to bring in fresh air and exhaust basement or foundation air to the outside.
- Vent air from beneath the concrete slab to the outside to remove RADON and soil gases.
These actions help keep RADON from entering through cracks or gaps in the slab and maintain a healthier indoor environment.
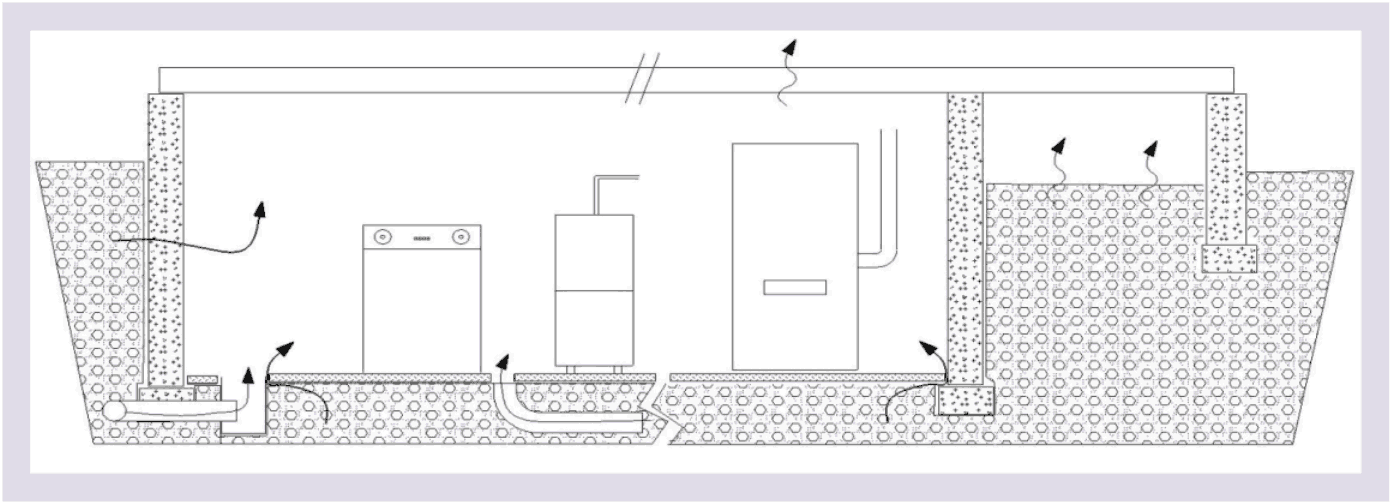
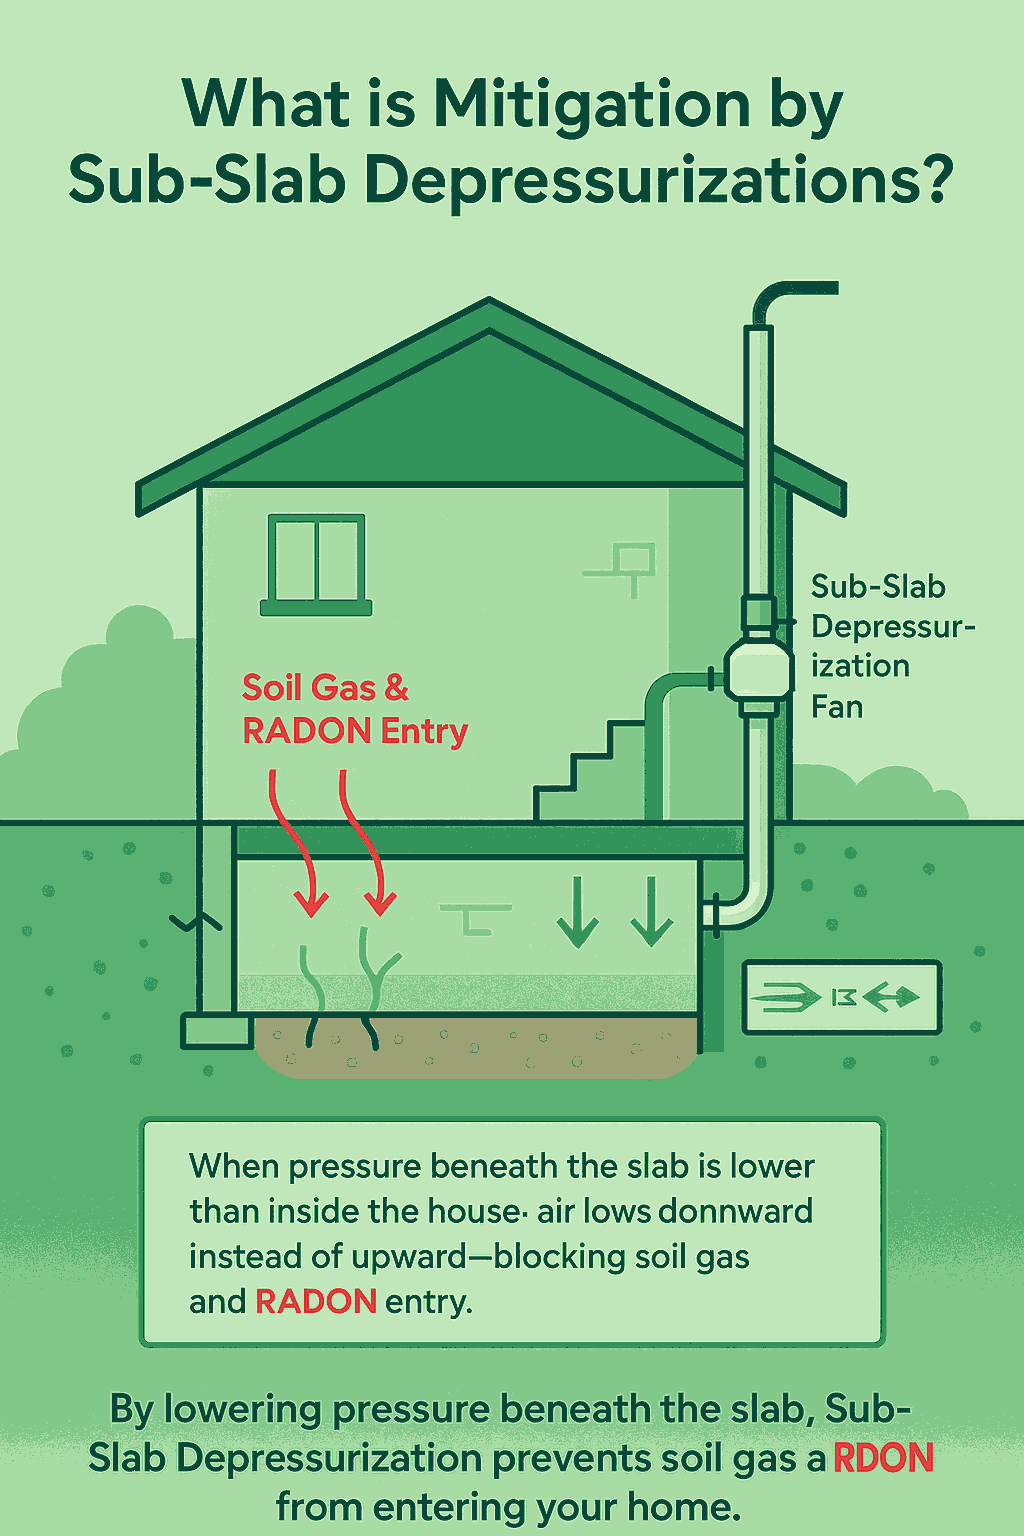
Sub-Slab Depressurization (SSD) is the most common and effective method to reduce RADON in homes with poured concrete basements.
RADON and soil gas enter through cracks, gaps around pipes, or where the floor meets the wall. By using a small electric fan to create lower pressure under the floor slab than inside the house, the system reverses airflow-drawing air from the house into the ground instead of the other way around.
This prevents soil gas and RADON from being pulled into the home, helping maintain a safer indoor environment.
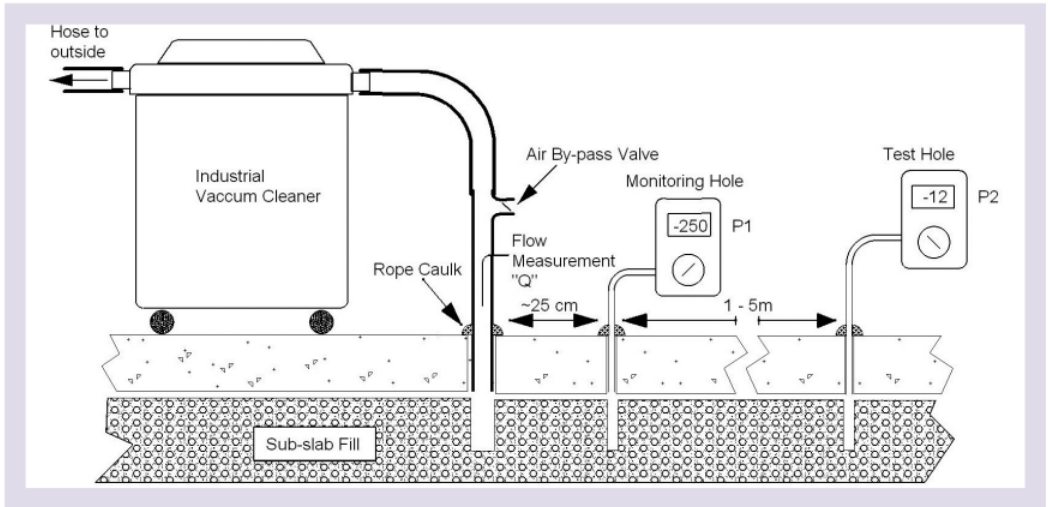
The Feasibility Test, also called a Pressure Field Extension (PFE) Test or Communication Test, helps determine how effective a RADON mitigation system can be before installation.
A temporary high-suction fan, such as a 1.5 kW commercial vacuum cleaner, is used to pull air from beneath the slab.
Small test holes are drilled around the slab, and a micro-manometer measures how far the suction field extends.
This shows how easily air can move through the material under the slab.
If the fill material under the floor is dense or not gravel, airflow resistance may be high.
In that case, more test holes are made closer together until a pressure change is detected.
This test helps decide the number of suction points and fan size needed for an effective RADON mitigation system.
.png)
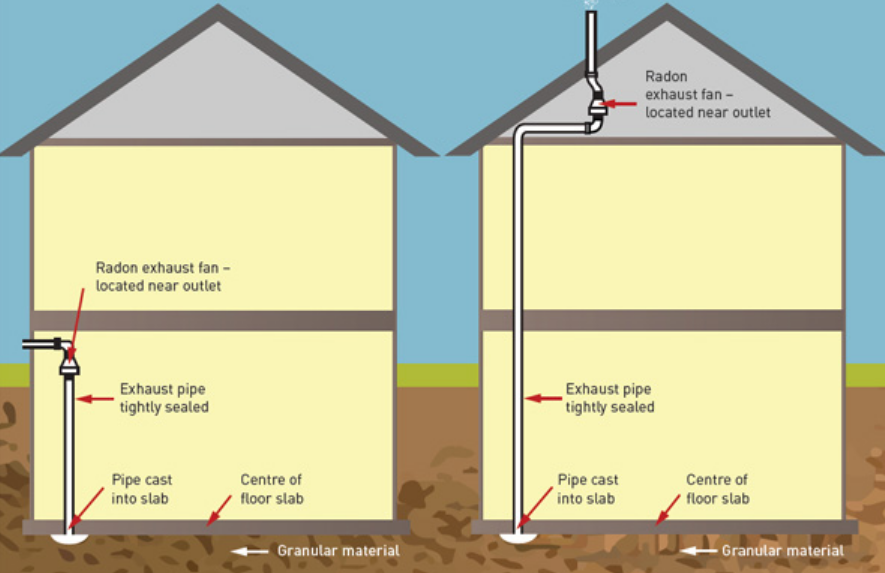
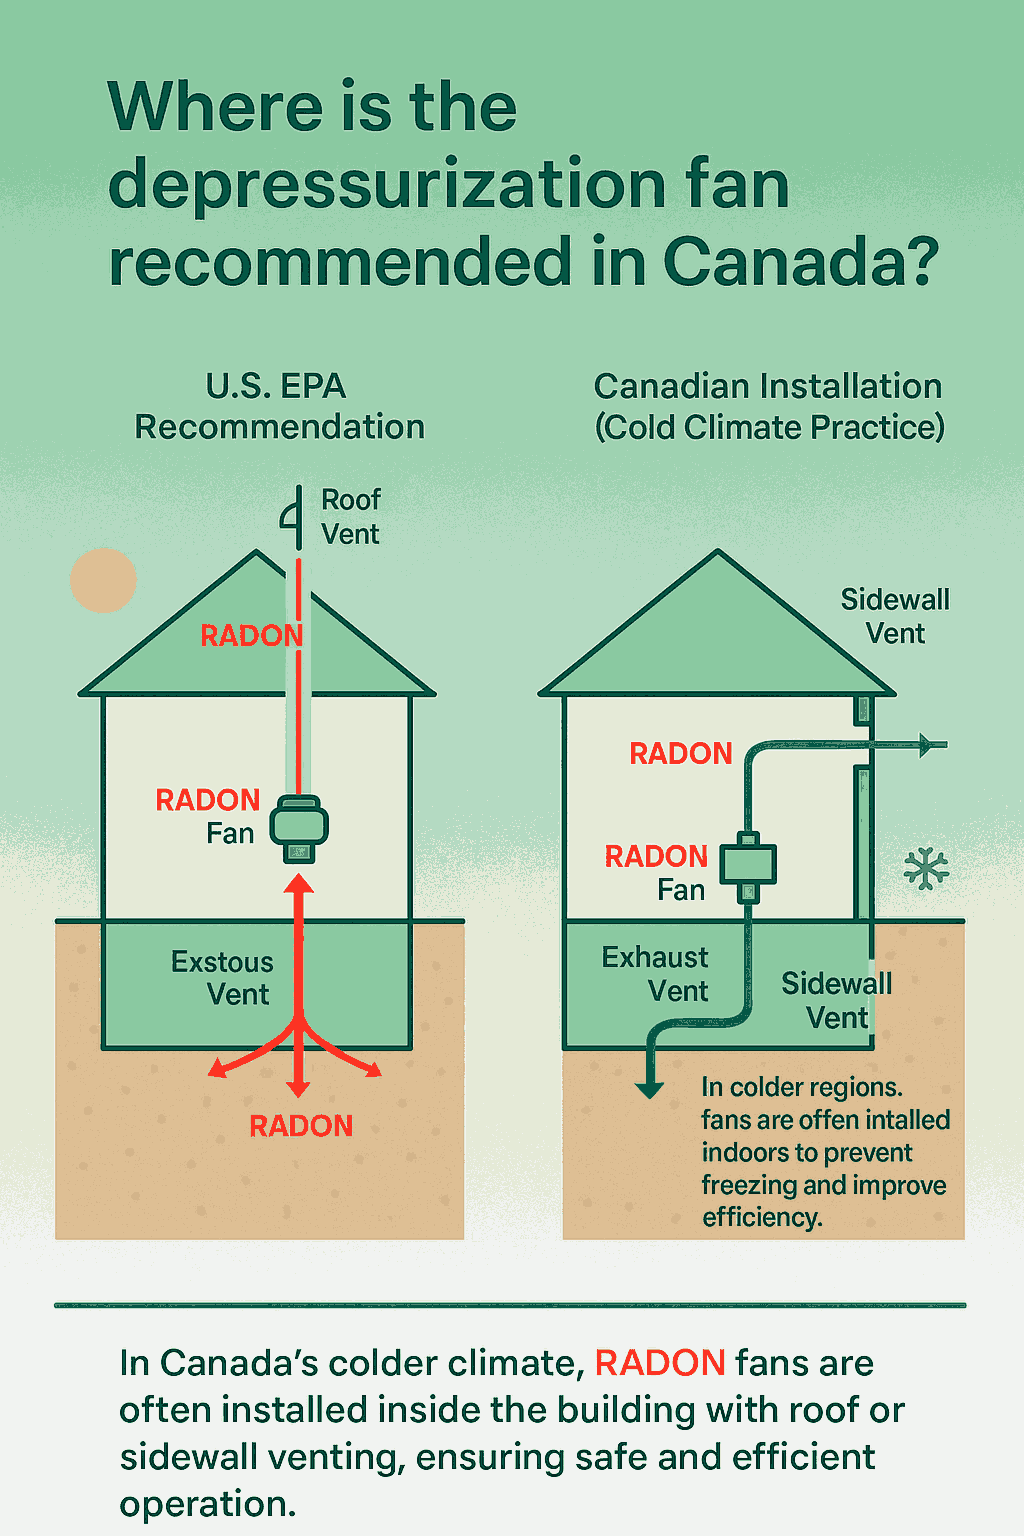
In the U.S., the EPA recommends installing the RADON depressurization fan outside the conditioned space and venting the system above the roof.
However, in Canada’s colder climate, mitigation professionals often install the fan inside the building, such as in a garage, attic, or basement mechanical area.
These systems can be roof-vented or sidewall-vented, and Canadian experience shows they perform safely and effectively when properly sealed and vented outdoors.
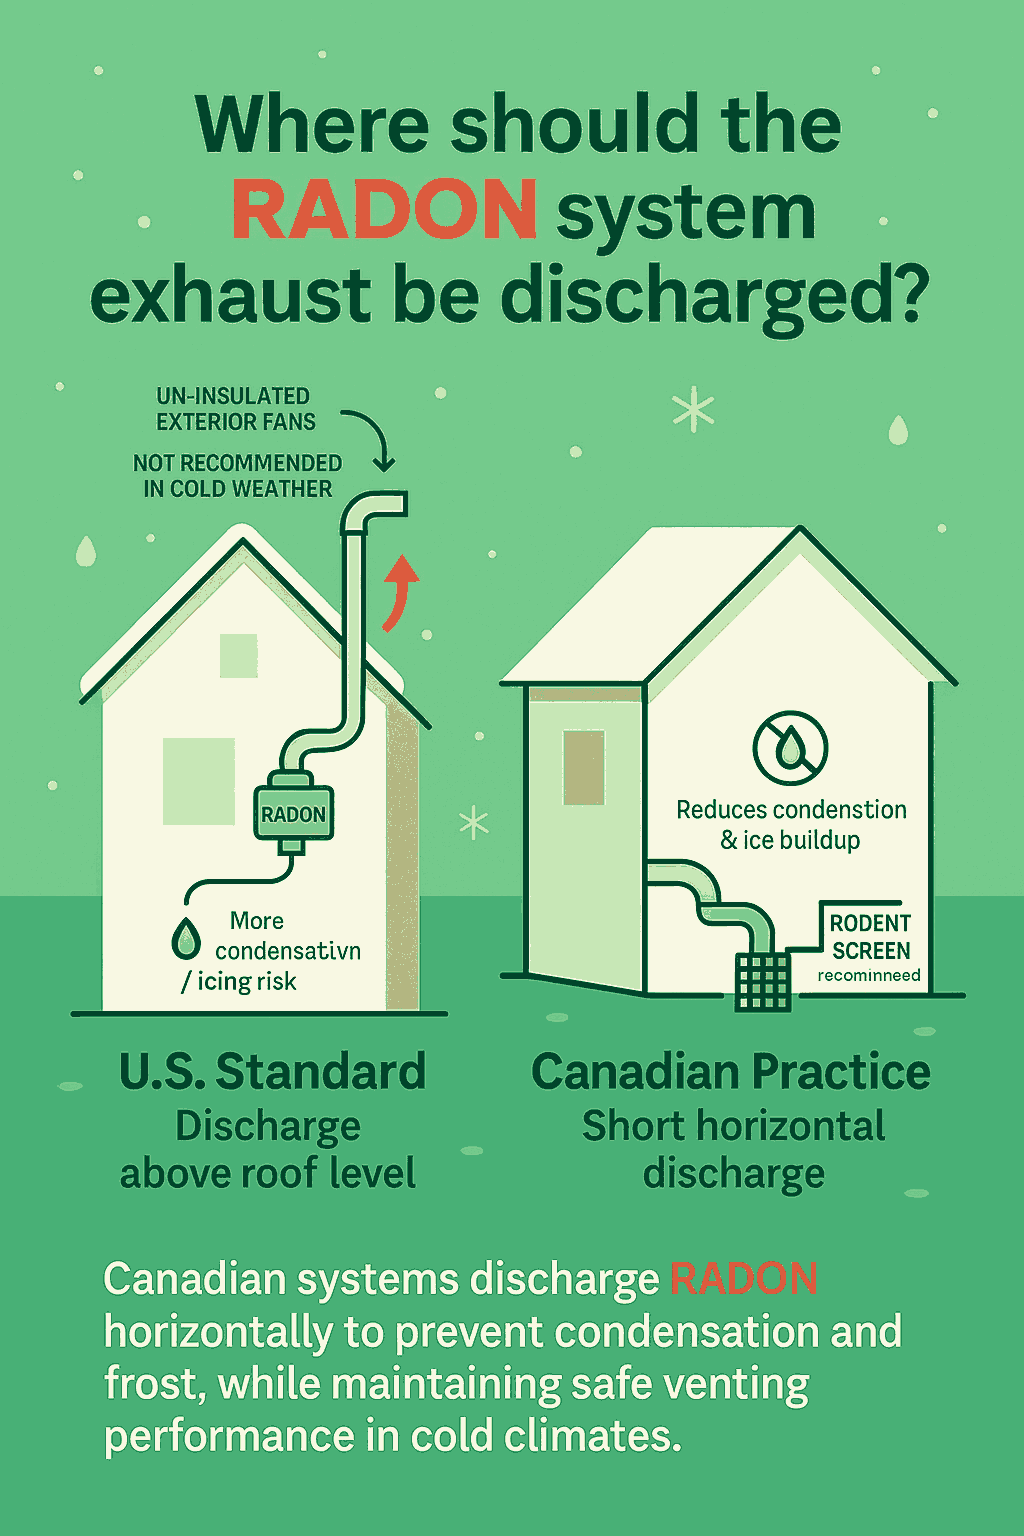
In cold climates, the condensate drain and exhaust pipe can freeze, reducing fan performance and lifespan.
For this reason, un-insulated outdoor fans or long exterior exhaust pipes are not recommended.
While U.S. standards require the RADON discharge to vent above the roofline, Canadian systems often discharge horizontally just outside the wall, keeping the exposed pipe short. This design helps reduce condensation and frost issues in winter.
A rodent screen should always be installed at the end of the discharge pipe for safety.
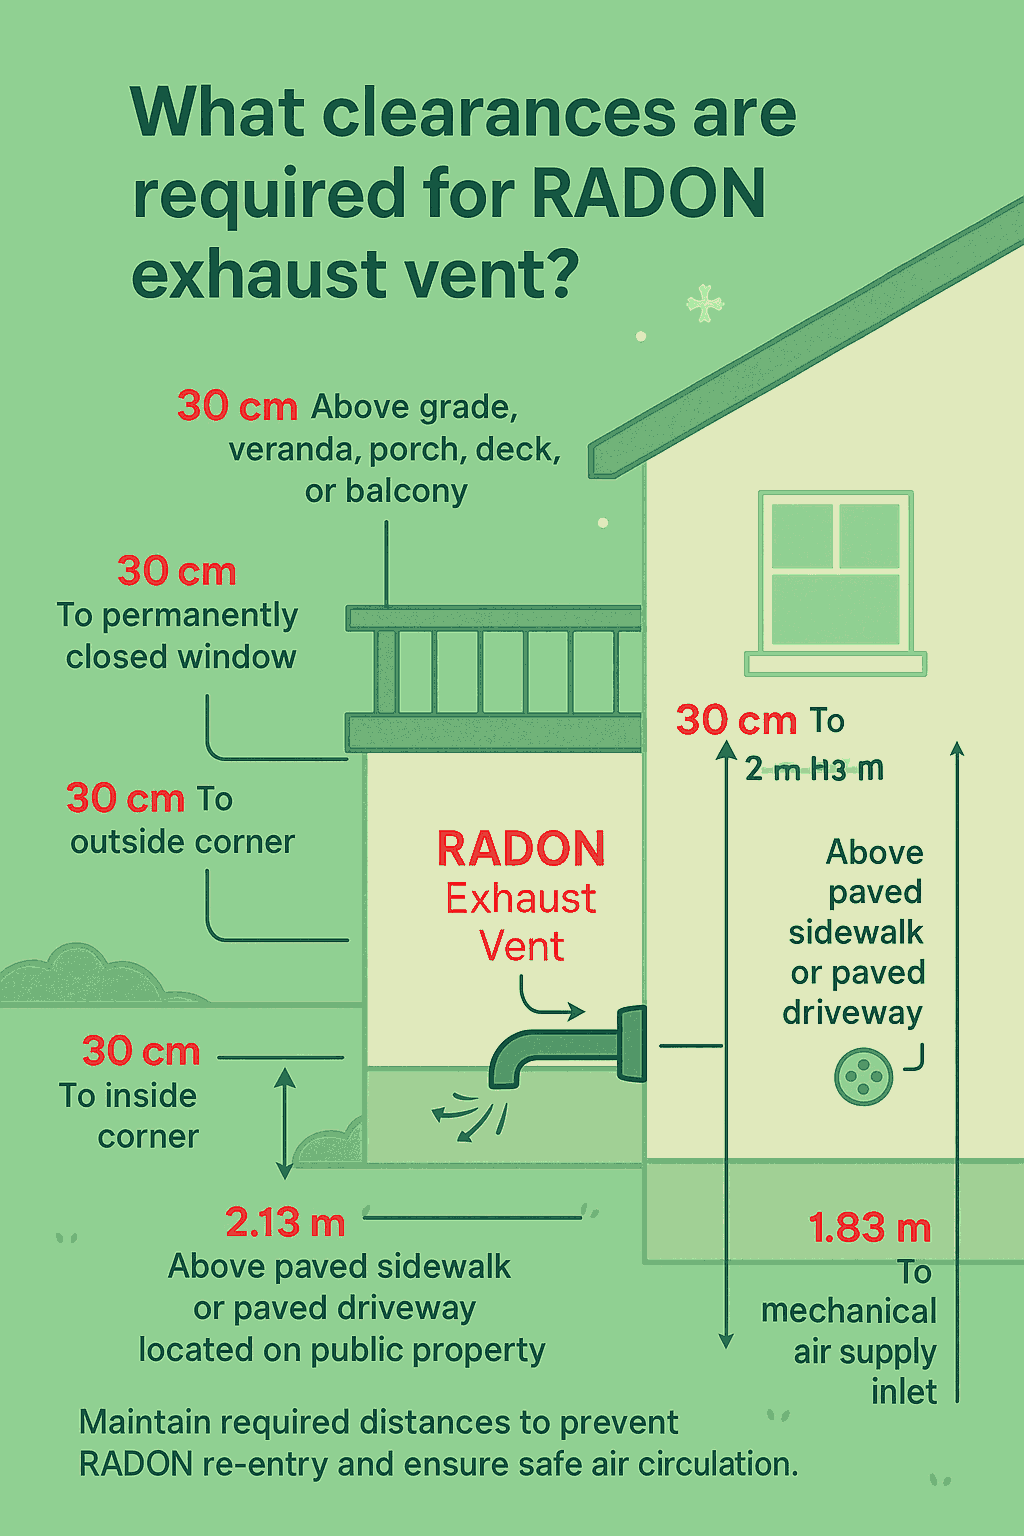
To ensure safe and effective RADON discharge, certain minimum clearances must be maintained from nearby structures and openings:
- Above grade, veranda, porch, deck, or balcony: 30 cm
- Under veranda, porch, deck, or balcony: 30 cm
- To permanently closed window: 30 cm
- To outside corner: 30 cm
- To inside corner: 30 cm
- Above paved sidewalk or driveway on public property: 2.13 m
- To non-mechanical air supply inlet or combustion air inlet: 30 cm
- To mechanical air supply inlet: 1.83 m
These distances help prevent RADON re-entry and ensure safe air circulation around the exhaust outlet.
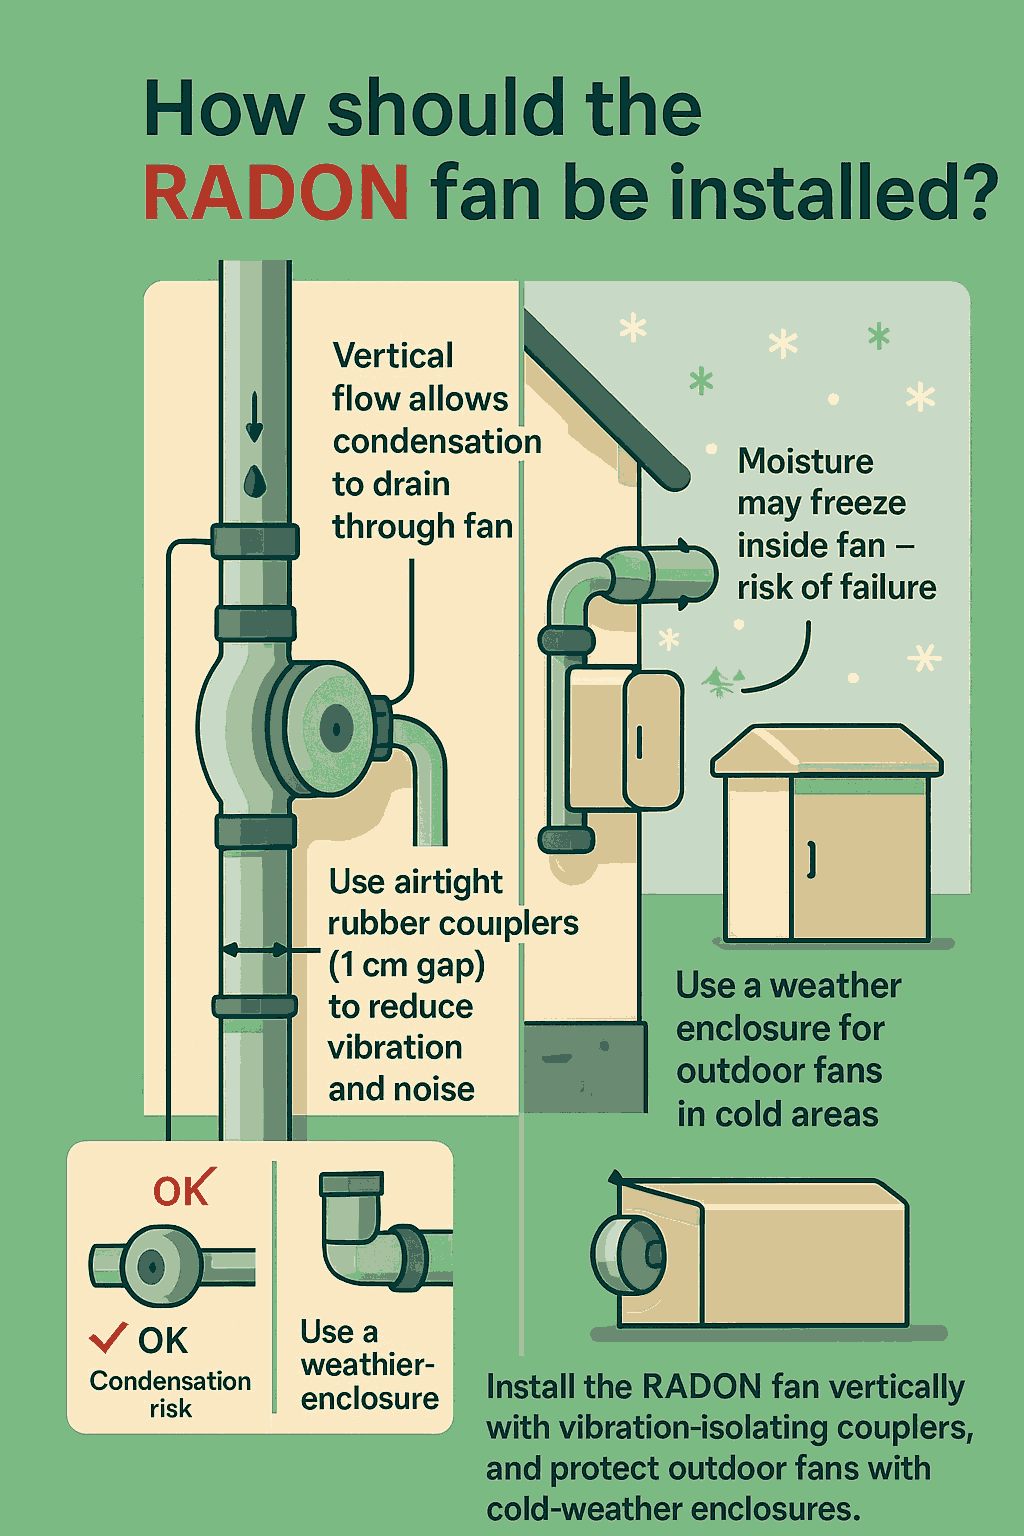
The RADON fan should be installed vertically so that any condensation drains through the fan rather than collecting inside it.
To reduce vibration and noise, connect the fan to the piping using airtight rubber plumbing couplers that keep about 1 cm of separation between the fan and pipe.
If both the inlet and outlet pipes are firmly mounted, the fan can be supported by these couplers alone.
In cold climates, an outdoor fan may fail early if moisture in the exhaust freezes inside the fan.
To prevent this, any exterior-mounted fan should be placed inside a protective enclosure - these are commercially available for cold weather protection.
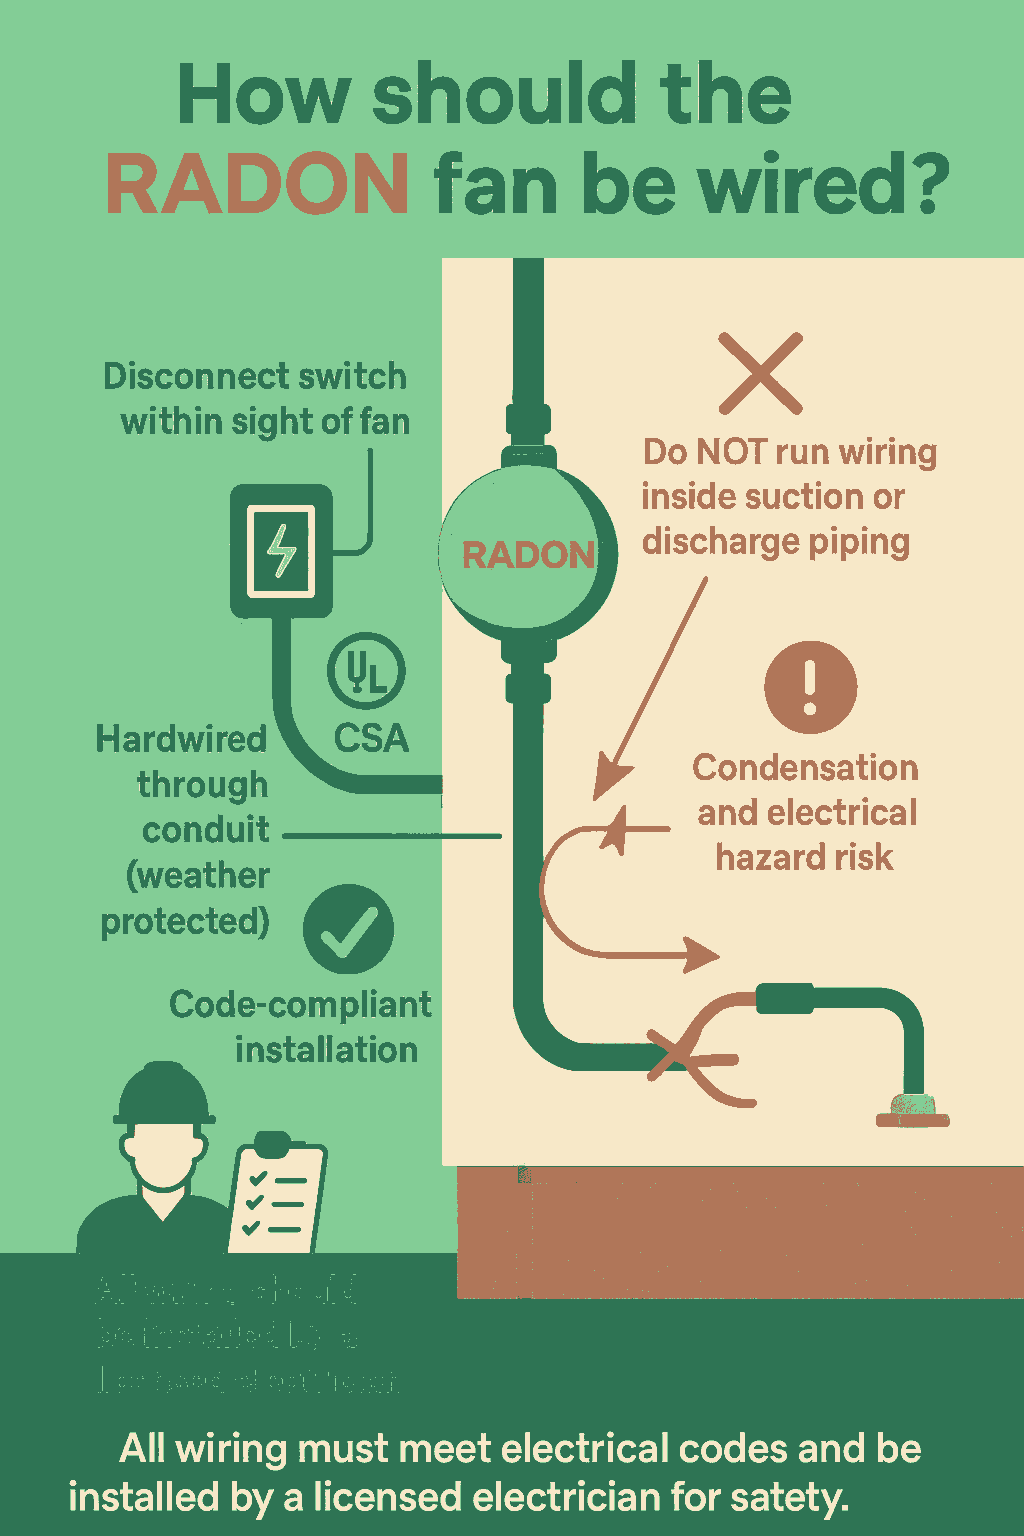
All wiring must follow the local electrical code, and components must be CSA, UL, or equivalent certified.
The fan disconnect switch or plug should be installed within sight of the fan for easy service access.
For exterior fans, wiring should be hardwired to an indoor junction box, and any outdoor wiring must be run inside conduit for weather protection.
⚠️ Never run fan wiring inside suction or discharge piping, or within HVAC ducts.
All electrical work should be performed by a licensed electrician to ensure safety and compliance.
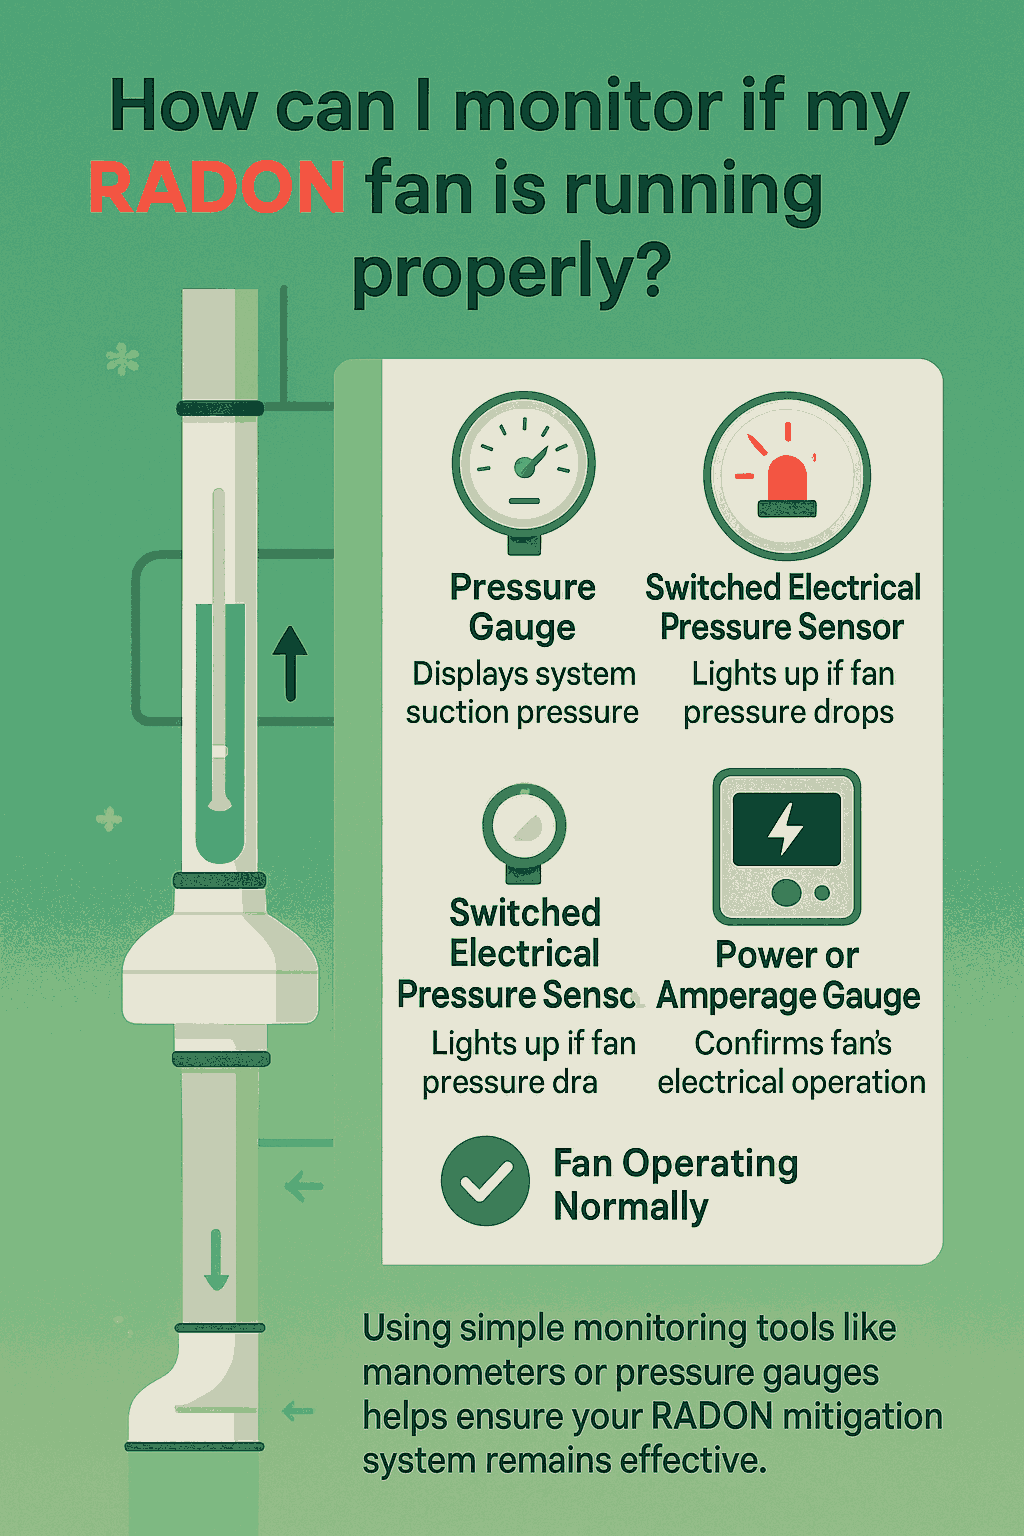
Every RADON mitigation system with a fan should include a way to monitor fan performance. This helps ensure your system is working correctly to keep RADON levels low.
Common monitoring options include:
- Manometer: Provides a visual display of the fan’s suction pressure.
- Pressure Gauge: Shows system pressure to confirm airflow.
- Switched Electrical Pressure Sensor with Warning Light: Triggers a light if fan pressure drops or stops.
- Power or Amperage Gauge: Measures the fan’s electrical draw to confirm normal operation.
Using one of these monitoring methods ensures your RADON mitigation system stays effective and that your fan is functioning continuously.
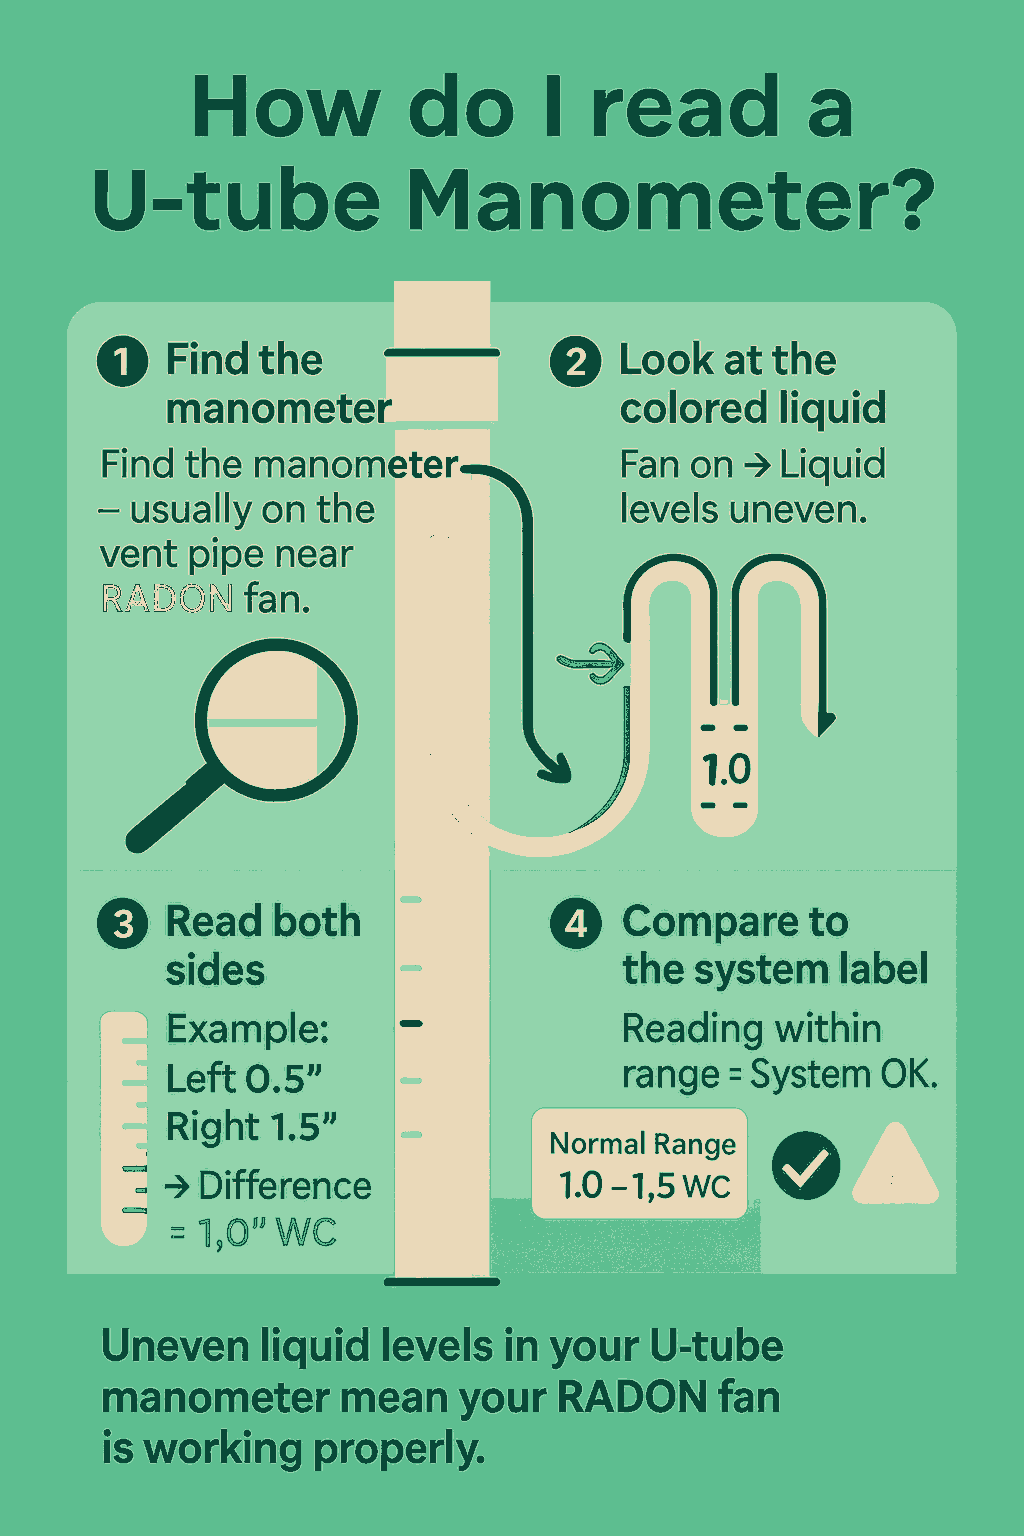
A manometer (usually a U-shaped clear tube) measures the pressure difference created by the RADON fan.
It’s installed on the PVC vent pipe and helps you see if the fan is running properly.
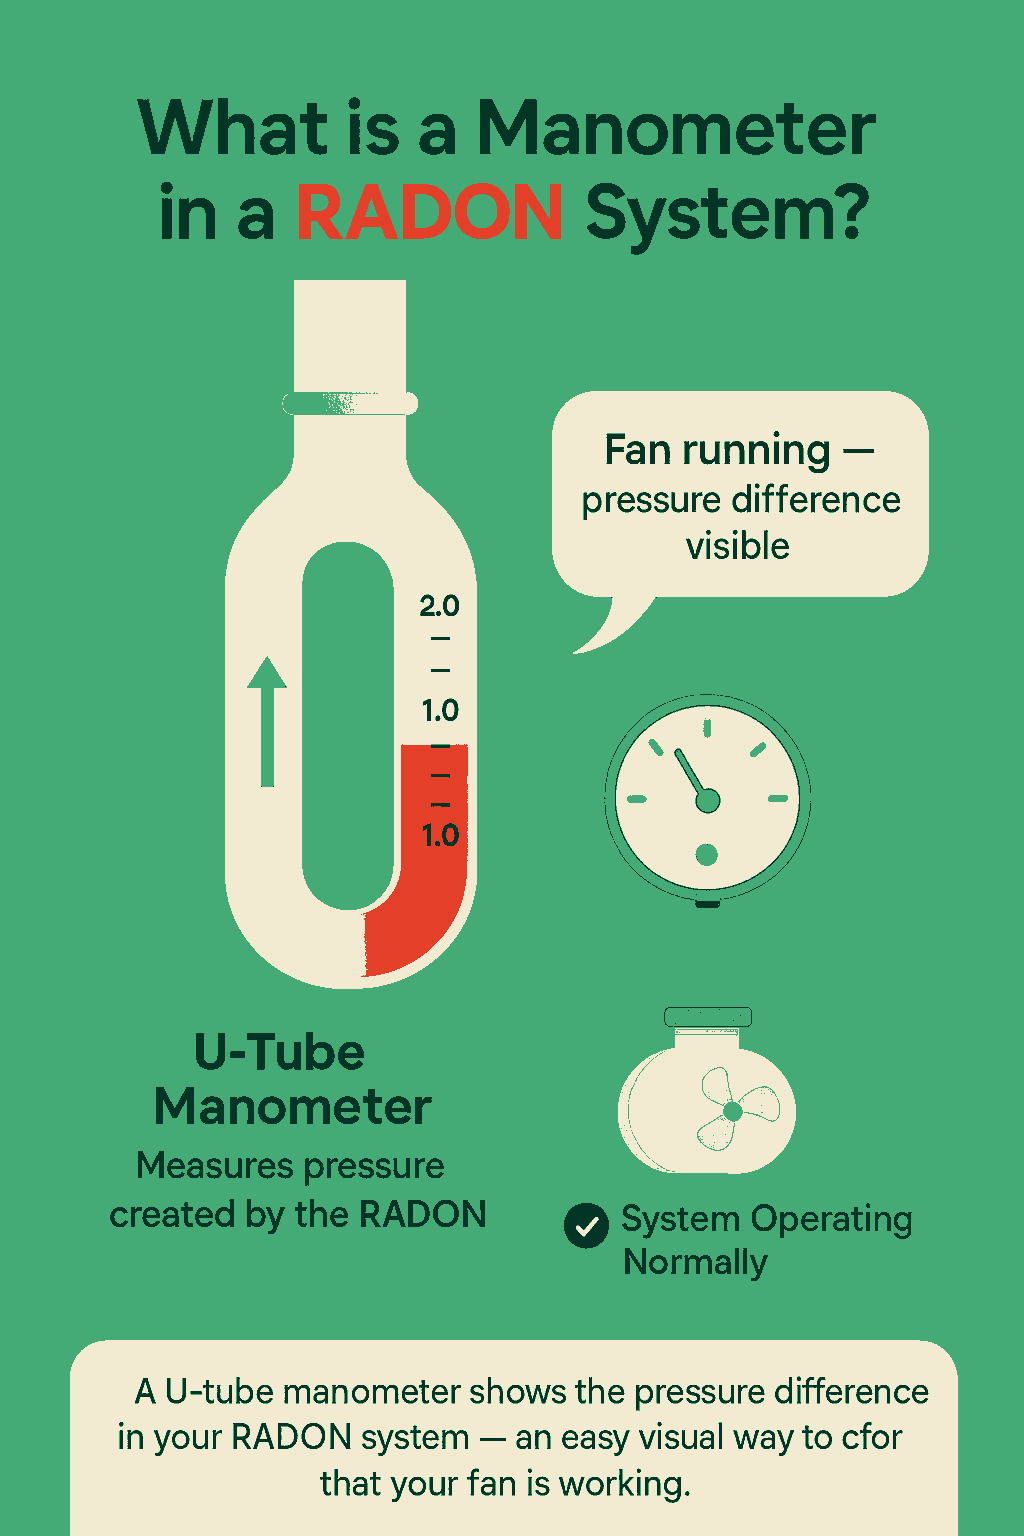
- Find the manometer - It’s mounted on the vertical vent pipe, often near the fan or in the basement.
- Look at the colored liquid - When the fan is running, the liquid levels will be uneven.
-
Read both sides - Note each side’s value in inches of water column (“WC”).
- Example: Left side = 0.5”, Right side = 1.5” → Difference = 1.0” WC.
-
Compare to the system label - The installer should mark a “normal range.”
- If your reading matches that range, your system is working correctly.
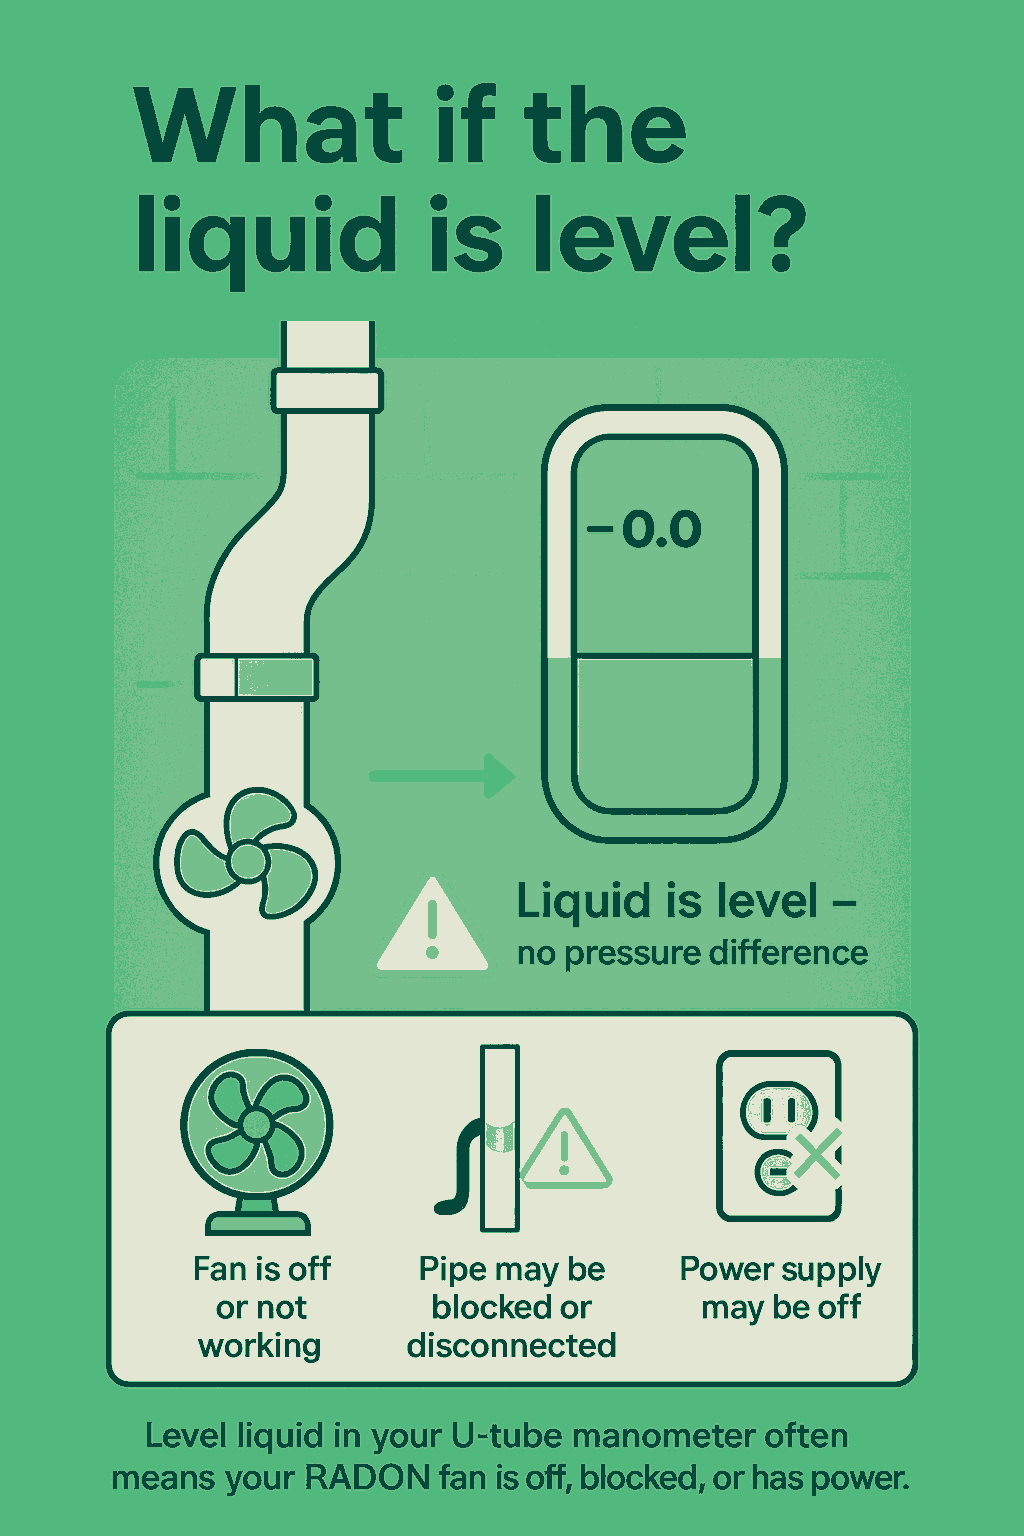
If both sides are level, it often means:
- The fan is off or not working
- The pipe is blocked or disconnected
- Power may be out
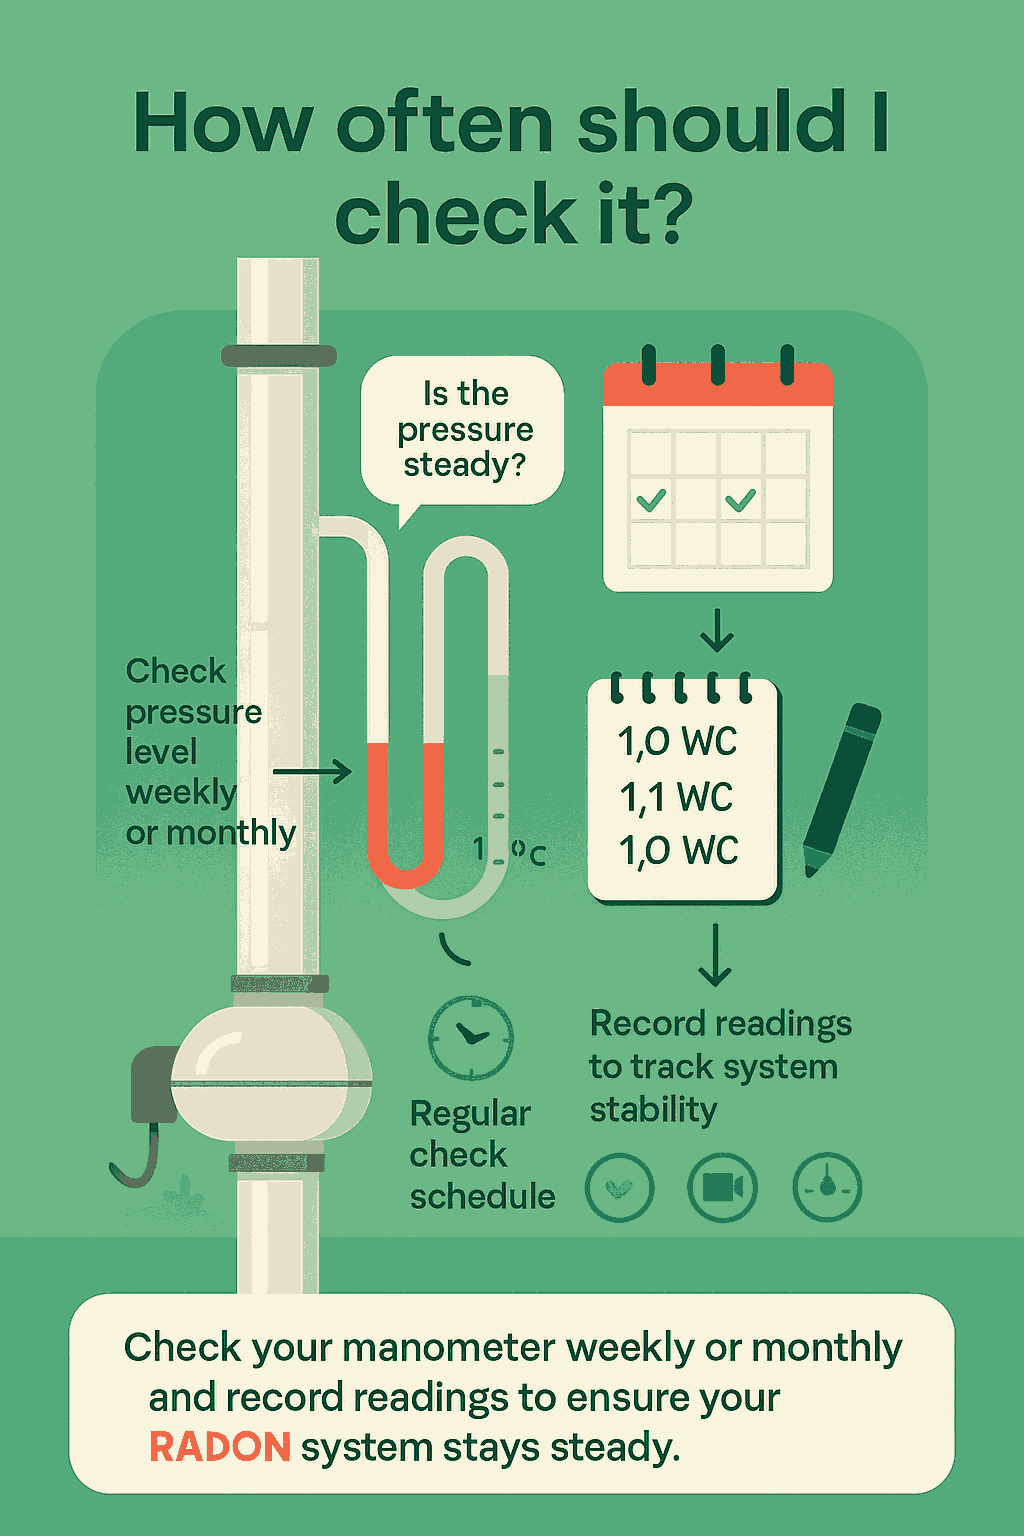
Check your manometer weekly or monthly.
Record readings occasionally to make sure your system pressure stays steady.
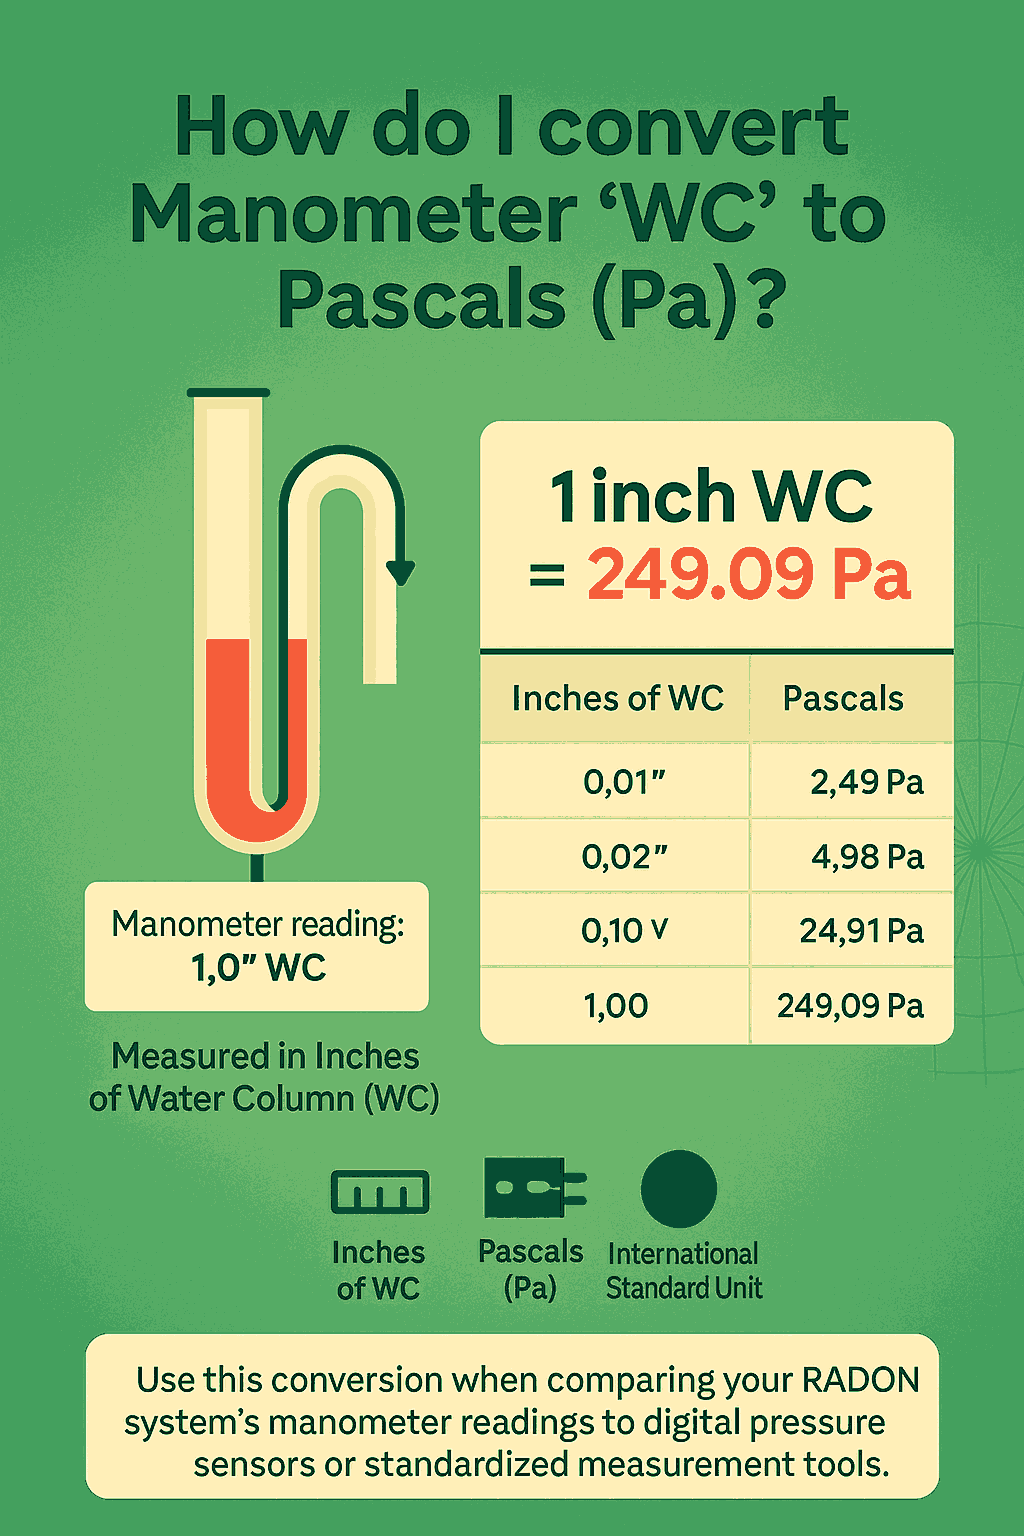
The pressure measured in inches of water column (WC) can be converted to Pascals (Pa) using this simple formula:
✅ 1 inch of water (WC) = 249.09 Pascals (Pa)
🔁 Examples of Common Conversions
| Inches of WC | Pascals (Pa) |
|---|---|
| 0.01" WC | 2.49 Pa |
| 0.02" WC | 4.98 Pa |
| 0.10" WC | 24.91 Pa |
| 1.00" WC | 249.09 Pa |
Tip:
Manometers used in RADON systems typically show readings in inches of water column.
Knowing how to convert to Pascals helps when comparing with international standards or digital pressure sensors.
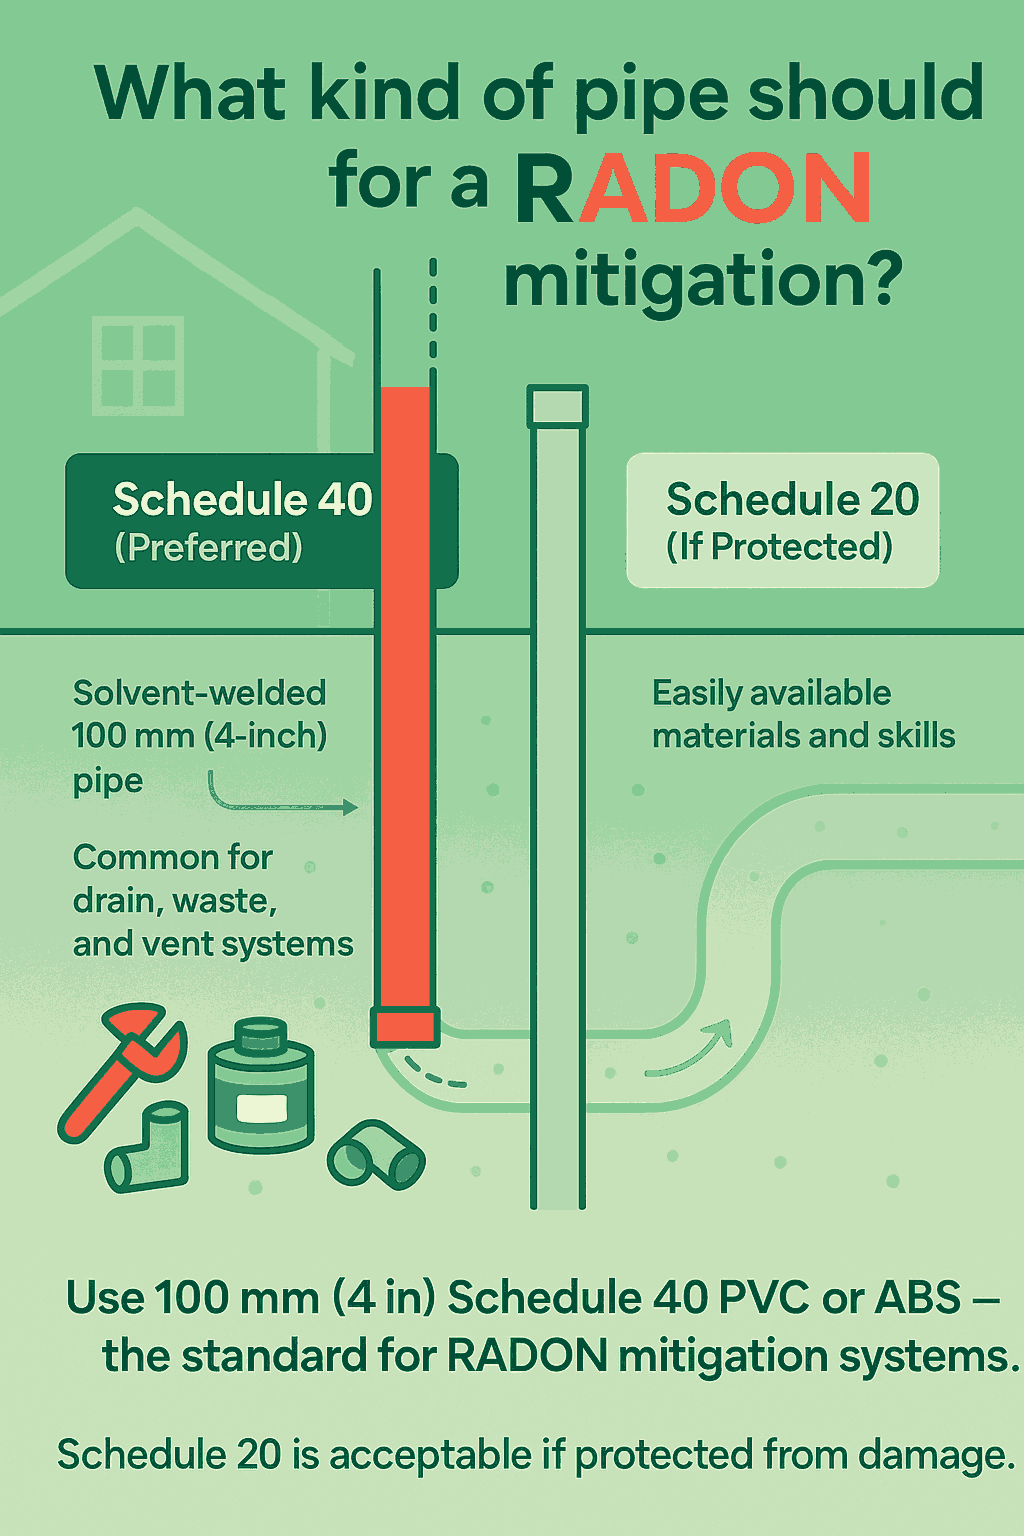
The preferred piping is solvent-welded 100 mm (4-inch) Schedule 40 PVC or ABS.
This type is commonly used for home drain, waste, and vent systems, so both materials and installation skills are easy to find.
A lighter Schedule 20 pipe can also be used if the pipe is well-protected and unlikely to be damaged.
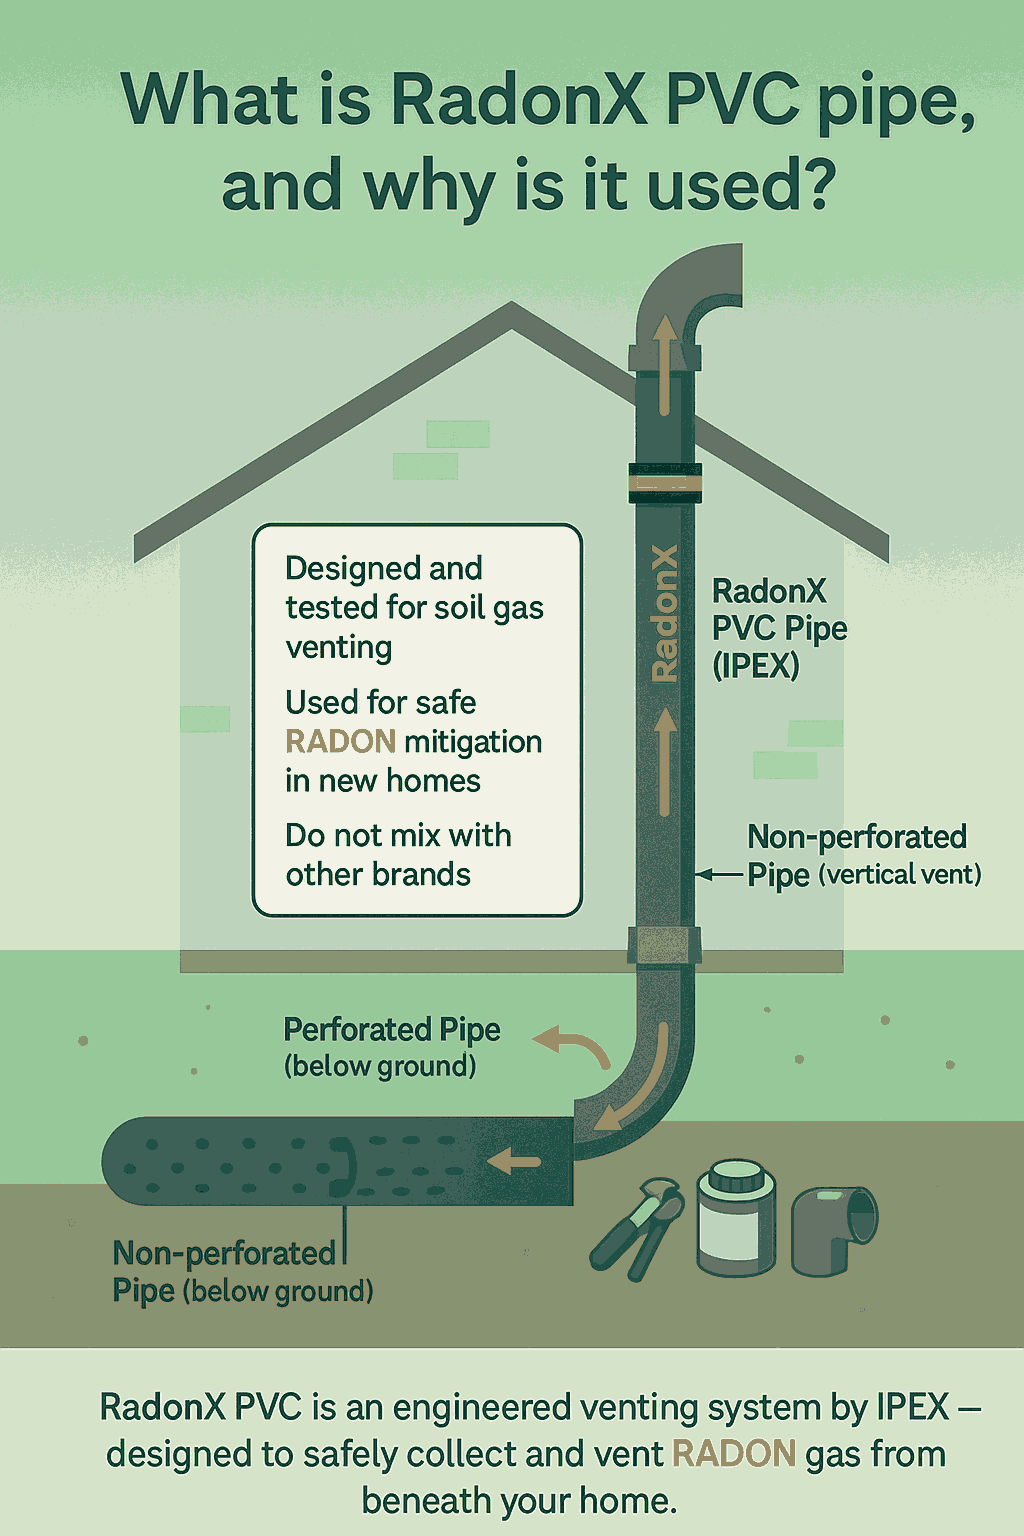
RadonX PVC pipe is a specialized venting system made by IPEX, designed specifically to help control RADON gas in homes.
Unlike regular PVC, it’s engineered and tested as a complete system for safe and efficient soil gas venting in new low-rise residential buildings.
Key points:
- Purpose: Collects and vents soil gases (including RADON) from beneath the concrete slab to reduce indoor levels.
- Material & Color: Durable, dark grey PVC with yellow safety markings.
-
Pipe Types:
- Perforated pipe – for gas collection below the slab.
- Non-perforated pipe – for venting above the roofline.
- System Integrity: Must use only RadonX pipes, fittings, and solvent cement together to prevent gas leaks.
- Compliance: Meets CSA B181.2, ASTM D2665, and ULC S636 standards.
- Installation: Installed during new construction, often with an option to add a radon fan for active depressurization.
Important:
Do not mix brands or use RadonX for other purposes. Always follow the IPEX Technical Manual and test RADON levels after installation to confirm safety.
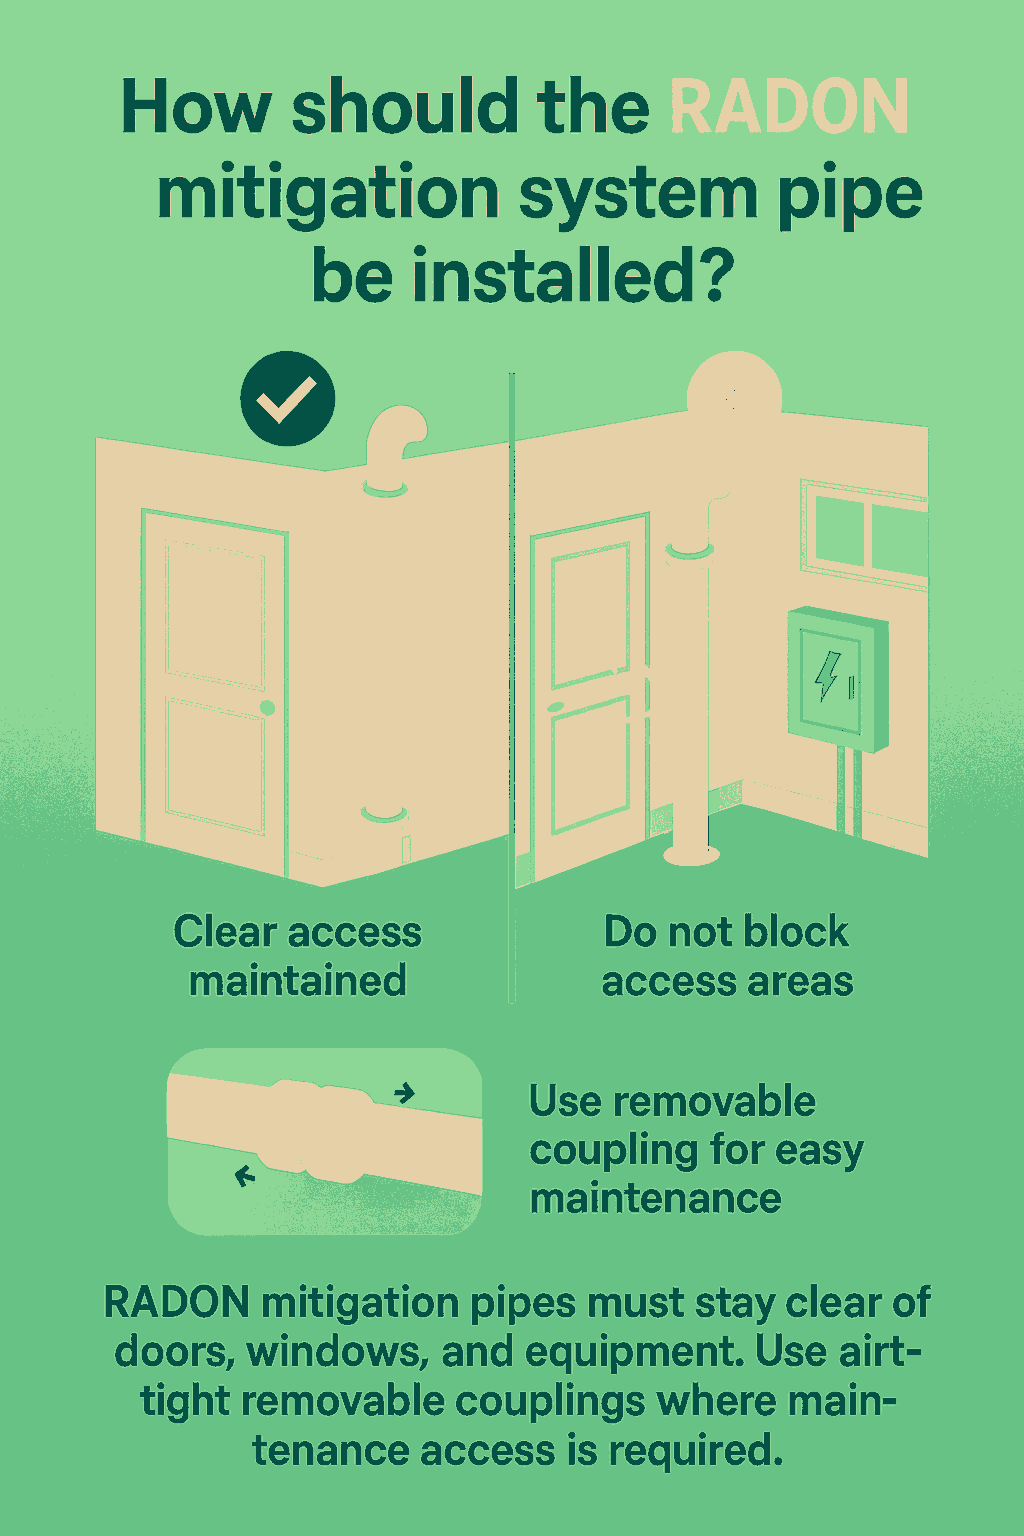
When installing a RADON mitigation pipe, make sure it does not block:
- Doorways or windows.
- Switches, electrical boxes, or control panels.
- Any areas that need regular inspection or maintenance.
If the pipe must pass through a service area, use airtight removable couplings so it can be easily removed and replaced when needed.
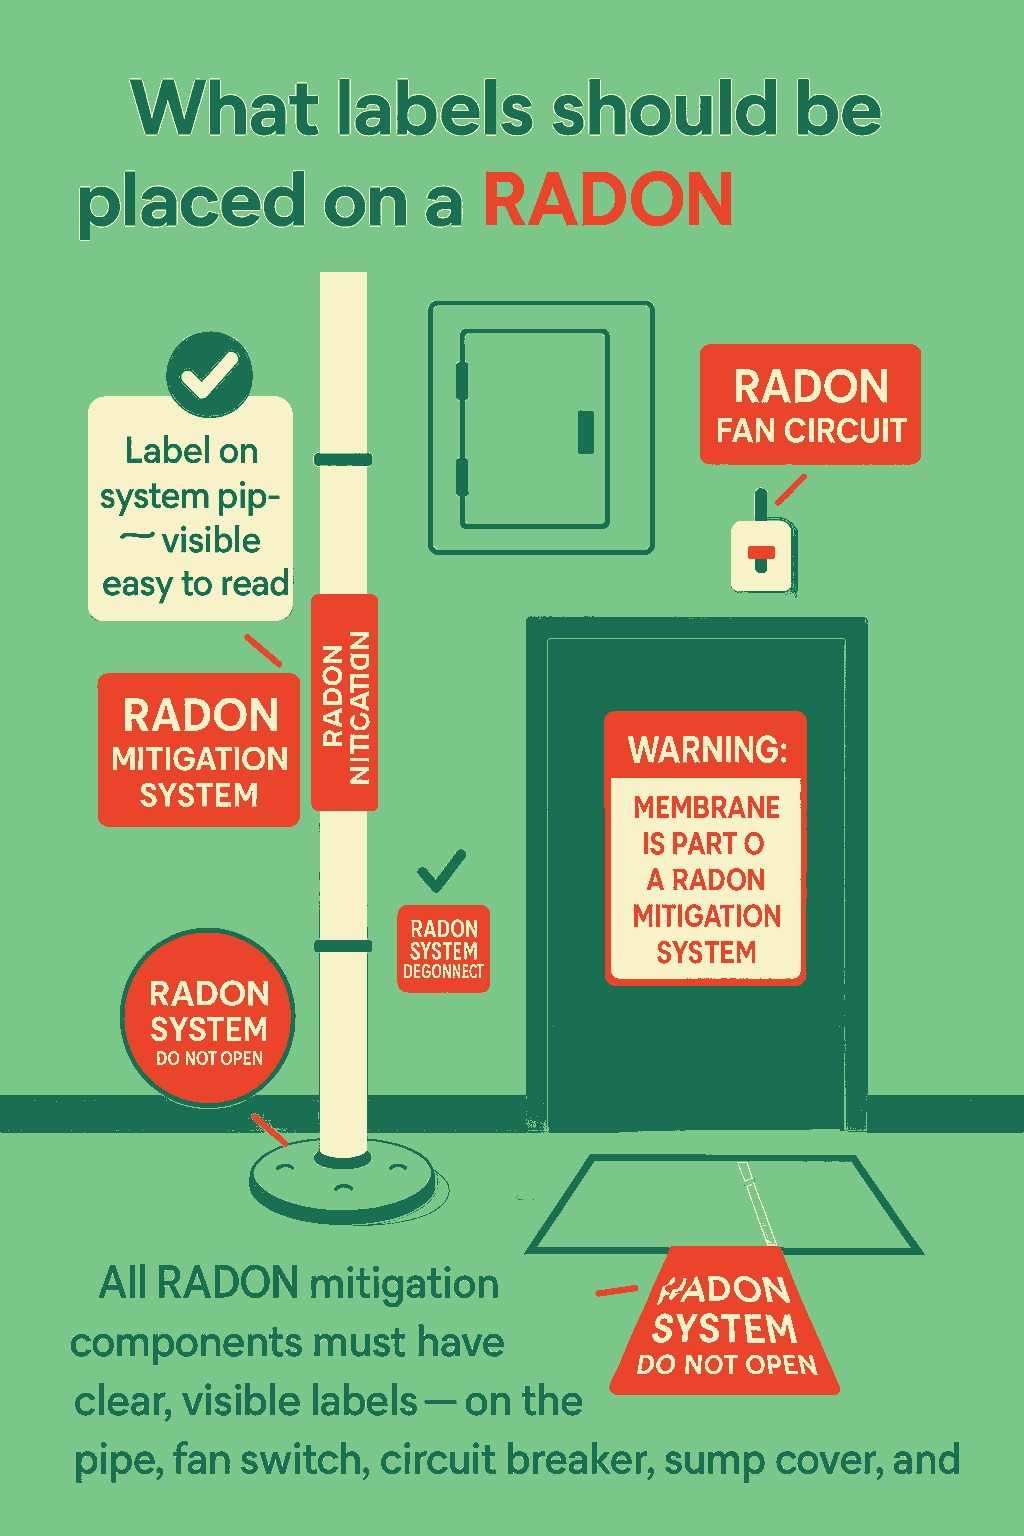
Place information labels on the system piping in a visible location to show it’s part of a RADON mitigation system.
Similar labels should also be attached to the:
- Service panel circuit breaker
- Fan disconnect switch
- Sump pit covers
If a sub-membrane depressurization system is used, place a warning label at the entrance to that area stating that the membrane is part of a RADON mitigation system.
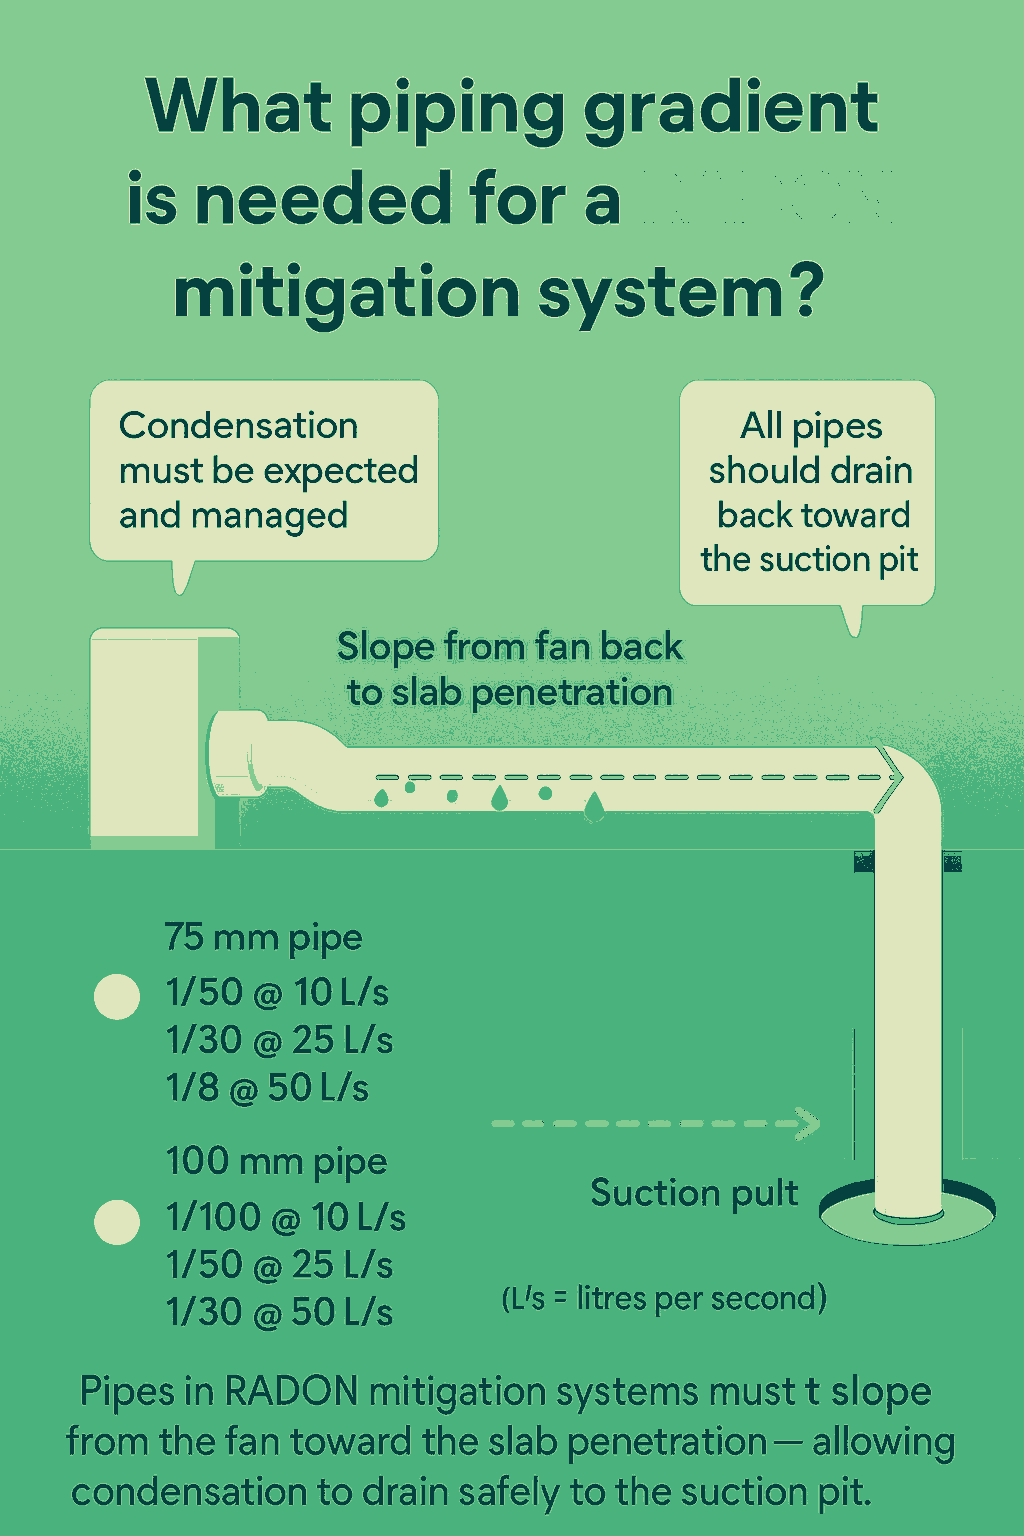
Because soil gas drawn into a RADON mitigation system contains water vapour, condensation is expected and must be managed properly.
All pipes should be sloped from the fan back to the slab penetration so that condensation drains safely to the suction pit.
Recommended Pipe Gradients:
-
75 mm pipe:
- 1/50 at 10 L/s
- 1/30 at 25 L/s
- 1/8 at 50 L/s
-
100 mm pipe:
- 1/100 at 10 L/s
- 1/50 at 25 L/s
- 1/30 at 50 L/s
(L/s = litres per second)
When the RADON mitigation system is first activated, the installer should:
- Inspect all seals and joints to ensure they are airtight.
- Check for loose connections or vibration noises and fix any defects found.
- Place a system label showing the activation date.
- Measure and record suction and airflow in the pipe - this data will be used later to compare fan performance during maintenance.
